E Commerce Settings
E Commerce Settings
A new E Commerce Settings page replaces the two previous ones, Shopping Cart Settings and Products Settings.
Find: E Commerce Settings Configuration
AwesomeBar's E-Commerce Preferences (search bar)
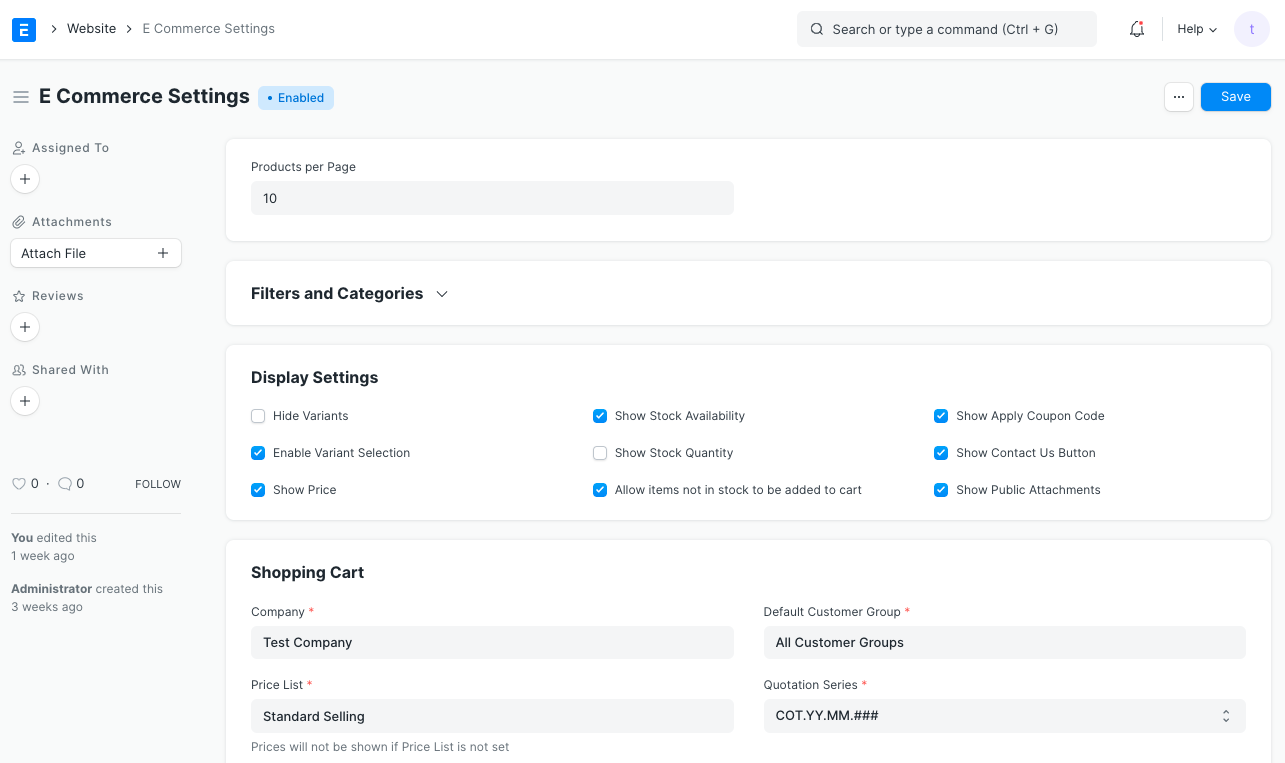
Products Per Page Set the maximum number of items to display on the Product Listing on the All Products page (/all-products).

Your listing will be more useful if you use filters. Two distinct varieties of filters exist:
1.Field Filters: To use filters based on specific fields, make sure the corresponding box is checked in the Field Filters section. The categories on the Store's Shop by Category page will be derived from these data points.
2.Attribute Filters: Turn on the Attribute Filters option and enter the attributes on which you want to have filters.
Display Settings
1.Hide Variants: The Product Listing should only display Website Item Templates.
2.Enable Variant Selection:If the Item has more than one type, show a configure button. It can help you find a specific item based on its attributes.
3.Show Price:Show the item's price on the page for that item.
4.Show Stock Availability:Show if the item is available.
5.Show Stock Quantity:On the product page, show how many are in stock.
6.Allow items not in stock to be added to cart:Let people add items that aren't in stock to their carts.
7.Show Apply Coupon Code:There is an extra way to use a coupon code at checkout.
8.Show Contact Us Button:Show a button that says "Contact Us" that customers can use to ask questions about the Item. It will make a Lead in the system.
9.Show Public Attachments: After a customer checks out, the Sales Order should include any public attachments.
Attribute Filters must be turned off for you to be able to Hide Variants.
Shopping Cart
1.Company:Tell us about the company for which the web shop is set up.
2.Price List:Mention Price List to be taken into account when looking up Item Prices.
3.Enable Shopping Cart:Add the option to put things in the cart.
4.Default Customer Group:Add the Default Customer Group to be set when customers are automatically created when an item is added to the cart.
Checkout Settings
1.Enable Checkout: If checkout is turned off, when a customer adds an item to the Cart, they can click the Request for Quotation button to get a quote for it. In the system, a Quotation is made. If it is turned on, when you click the Place Order button in the Cart, a Sales Order is made.
2.Payment Gateway Account:You need to have PayPal Integration or Razorpay Integration if checkout is enabled.
3.Payment Success Url: Send users to the chosen option after payment completion.
4.Show Price in Quotation: You can decide whether or not to display prices for website items in the quotation if checkout is disabled.
5.Save Quotations as Draft: If checkout is disabled, you can decide whether the automatically created quotation must be submitted automatically or stored in the draft state by selecting the Request for Quote button.
Add-ons
1.Enable Wishlist:Provide the capability of adding things to a Wishlist.
2.Enable Reviews and Ratings:Provide a feature allowing users to rate and review items on the website.
3.Enable Recommendations: Provide a feature that allows you to display manually chosen suggested things next to website items.
Shop By Category A pre-built page called Shop By Category lists categories connected to website items. The Field Filters table in the Filters and Categories section allows for the configuration of these categories.
A slideshow may also be chosen as the page's banner.
Guest Display Settings
1.Hide Price for Guest: For visitor users, you can display or conceal pricing next to website items (users who are not logged in).
2.Redirect on Action:You can choose a URL to refer a guest user to if they attempt to add an item from the website to their cart or wish list. Guest users are automatically sent to the /login page. By inserting a URL here, for example, you can instead link them to a specific Web Form of your choice.