A company is a type of legal entity created by a group of people to operate a business or industrial venture.
When a Geer ERP account is set up, the first Company is created in Geer ERP. Depending on the nature of your business activity, you can select a manufacturing, retail, or services domain for each Company.
If you have more than one company, you can add them from:
Home > Accounting > Company
1. How to create a new Company
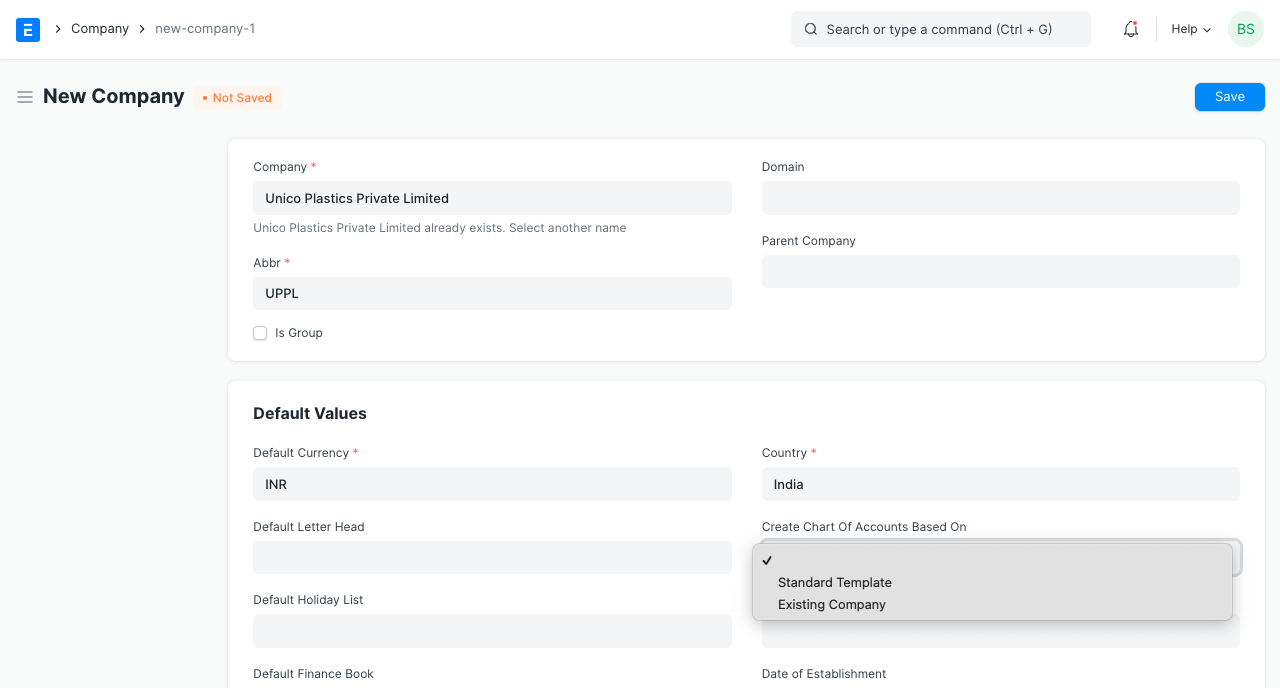
- Click New from the Company list.
- Enter the company's name, shorthand, and default currency.
- Save.
Your company's acronym is generated by default. FT for Frappe Technologies, as an illustration. The acronym makes it easier to distinguish between the assets of various businesses.
The acronym can also be found in your company's numerous accounts, cost centers, tax templates, warehouse, etc.
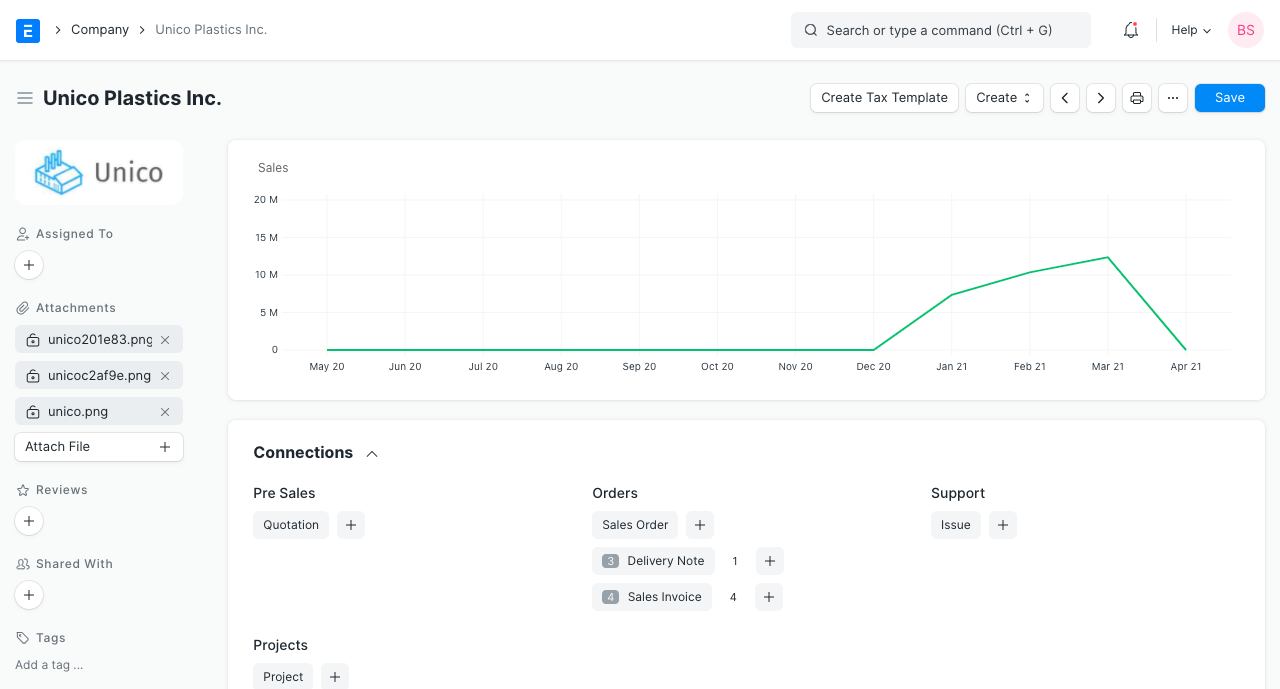
Additionally, you can include a company description and company logo.
1.1 Multi Company Structure
Assume you are the manager of a group of businesses, some of which may be smaller and some of which may be larger and are a part of the larger business (s).
You can create several companies in Geer ERP. The organizational structure of the business may be parallel, consisting of sister firms, parent-child enterprises, or both.
A parent company is a bigger business that includes one or more kid businesses. Subsidiary of a parent firm is a child company.
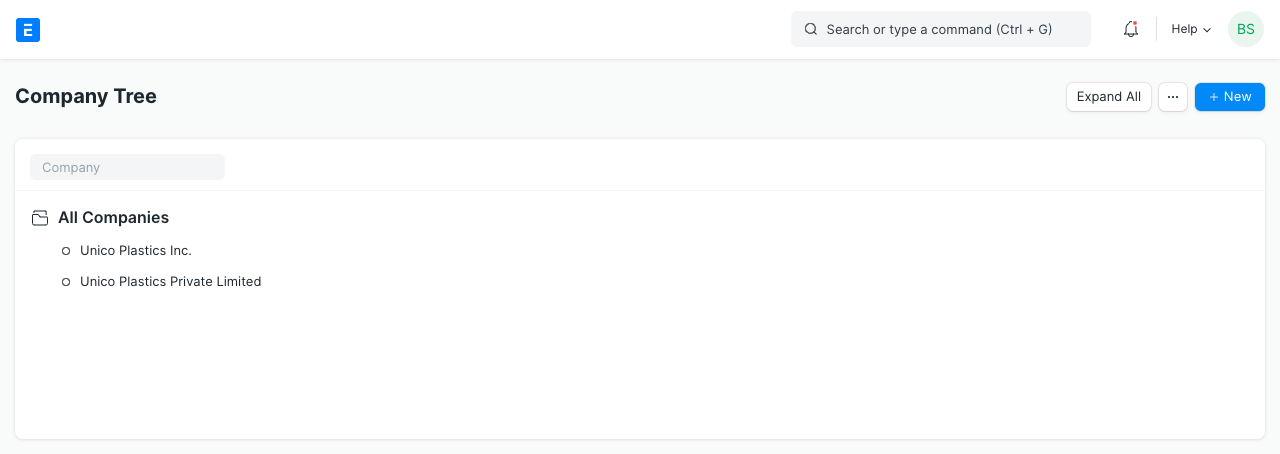
The overall organization of your firms is seen in the company tree view.
Geer ERP will verify whether the accounts of the child firms match the accounts of the parent company when you establish a company tree. A consolidated chart of accounts statement may be created by combining all the accounts.
1.2 Other Options when Creating a Company
Domain: The industry in which the business operates. For instance, manufacturing, services, etc. When creating your account, select one. - If this box is checked, the entity becomes a group. - If this is a child company, choose the parent from this field by choosing the group company that this firm is a part of. - If a parent company is chosen, it will be used to produce the chart of accounts for the new firm you are creating.
1.3 Chart of Accounts
The master for the Chart of Accounts is kept individually for each Company. This enables you to keep separate accounts for each business in accordance with the law. Using the Charts Of Accounts Importer, you may also import a chart of accounts.
For some nations, localized Charts of Accounts are easily accessible using Geer ERP. You can select one of the following choices when setting up the chart of accounts for a new company.
- Based on the existing company's chart of accounts,
- the standard chart of accounts
1.4 Defaults
Many of the default values for masters and accounts can be set in the Company master. With the value for the account being pulled from the Company master if provided, these default accounts will assist you in the speedy posting of accounting transactions. A default Chart of Accounts and Cost Center are automatically established as soon as the company is created.
For a business, the following defaults can be set:
Standard Working Hours
- Default Letter Head
- Default Holiday List
- Terms & Conditions of
- Default
- Country
- Tax ID
- Establishment Date
2. Features
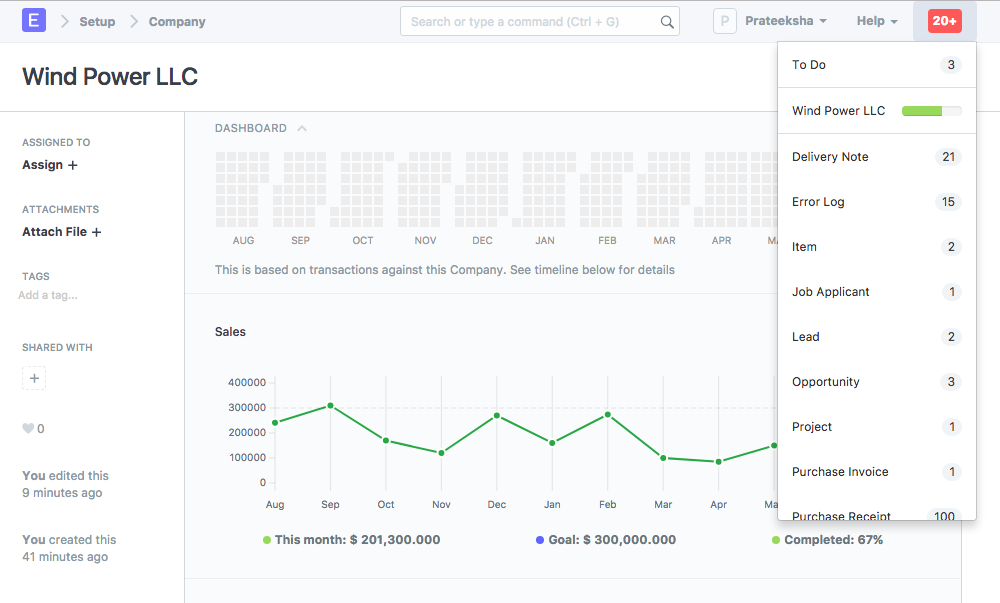
2.1 Monthly Sales Target
Set the monthly sales goal at, say, $10,000 in the company's currency. Once transactions have been performed, the monthly total sales will be displayed. To learn more, go here.
2.2 Account Settings
Some of the following accounts will be set by default when you create a new company, others can be created. The accounts can be seen in the Chart of Accounts. These values can be changed later on if needed.
- Round Off Account
- Round Off Cost Center
- Default Bank Account
- Default Cash Account
- Default Receivable Account
- Write Off Account
- Discount Received Account
- Exchange Gain/Loss Account
- Unrealized Account
- Discount Allowed Account for Exchange Gain/Loss
- Account for Payable Defaults
- Account for Employee Advances
- Account for Cost of Goods Template for Sold Account
- Default Income Account
- Sold Account
- Default Deferred Revenue Account
- Sold Account
- Default Deferred Expense Account
- Sold Account
- Default Payroll Payable Account
- Sold Account
- Default Expense Claim Payable Account
- Sold Account
- Default Cost Center Credit Limit.
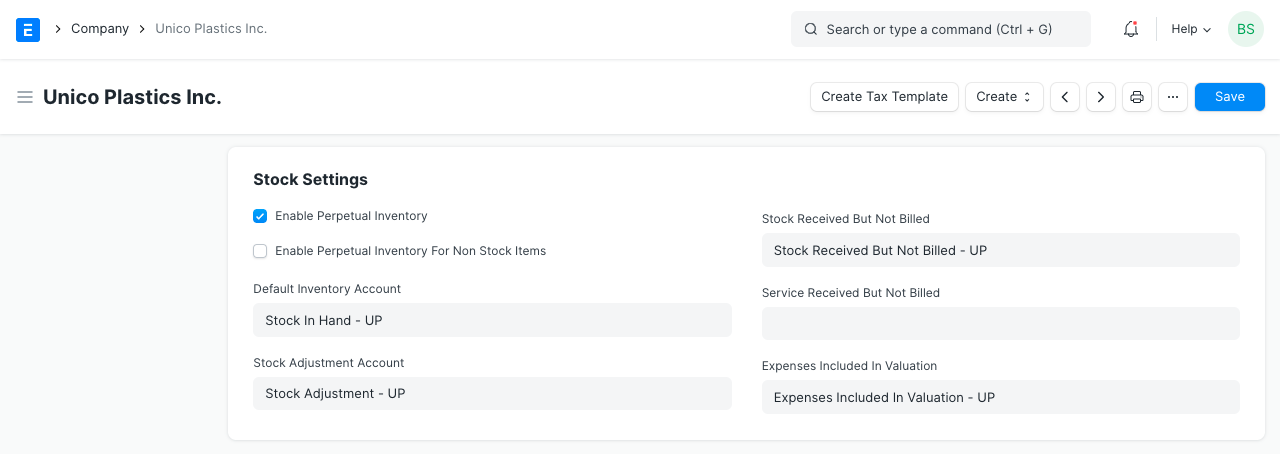
2.3 Stock Settings
The perpetual inventory feature would cause stock transactions to have an effect on the company's financial records. Find out more here. It is by default turned on.
Adjustment to - Default Inventory Account - Costs Associated With Valuation Included Account - Stock Received But Not Billed
2.4 Fixed Asset Defaults
The following accounts are required by a firm to manage its fixed assets. The majority of them will already be created. In the Chart of Accounts, they are depicted.
- Depreciation expense from the accumulated depreciation account
- Account Series for the Entry of Asset Depreciation (Journal Entry)
- Costs Added to Asset Valuation
- Gain/Loss Account
- on Asset Sale
- Depreciation of Assets
- Asset Received But Not Billed
- Account for Capital Work in Progress at the Cost Center
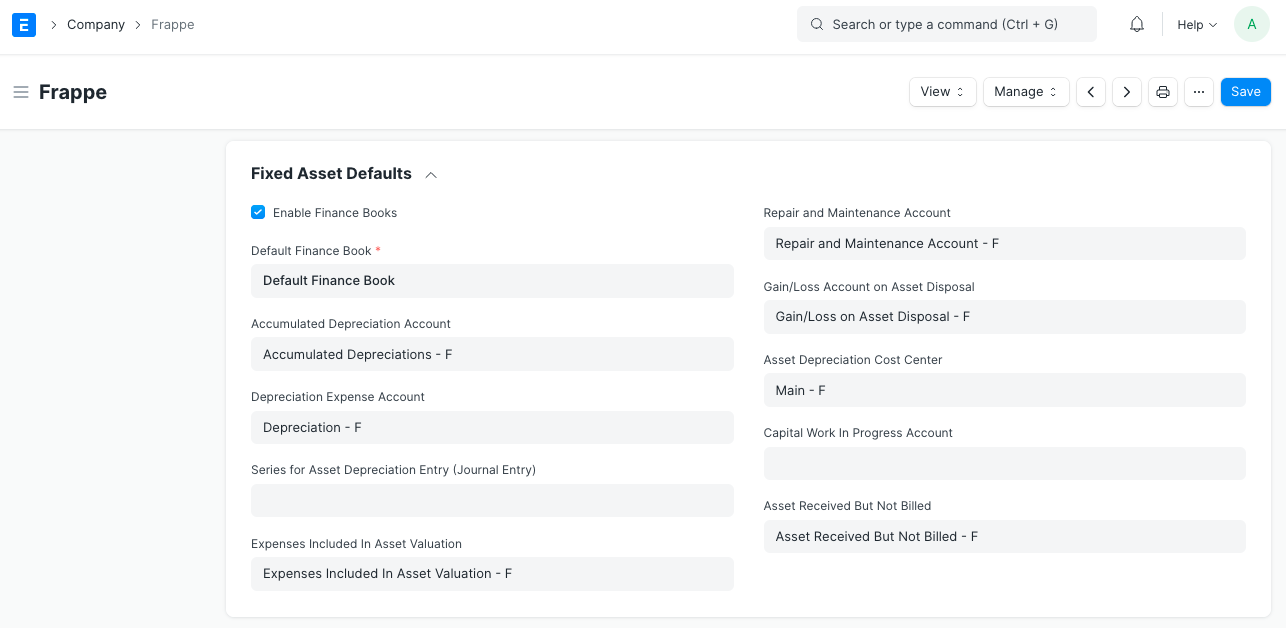
Check the Enable Finance Books box and choose a default finance book if you want to book your accounting transactions against various finance books.
2.5 HRA Settings
The following Salary Components should have their default component set.
Setting the default number in this section will assist Indian users with employee tax declaration calculations, particularly for calculating the HRA exemption amount.
- Basic Element
- Component of HRA
- component of arrears
2.6 Bank Remittance Settings
for only India.
One document of transfer can be used for several bank transfers by using the Payment Order feature (in Accounts). You can create bank remittance in a format that can be accepted and that can also be submitted on the bank's portal by updating the values in the following fields.
A user can combine many payment entries or payment requests into a single document by using payment order. A user can send a single document to the bank via Bank Remittance in text format. This text format can then be manually uploaded to the Kotak Bank Payments Platform.
You received client and product codes from the bank. This must be included in the text file in the manner required by Kotak Bank.
2.7 Budget
Role for Exceptional Budget Approver: This role has the authority to approve expenses regardless of the established budget.
2.8 Company Info
Geer ERP allows you to store the following information about your business for reference.
Registration Information: - Date of Incorporation - Phone No. - Fax - Email - Website - Address
It's vital to check the "Is Your Company Address" box when entering the address below.

If a corporation has many locations in India, different addresses can be listed with various GSTIN numbers. If your business has locations in Mumbai, Delhi, and Bangalore, for instance, you'll need to add various addresses with various GSTIN numbers.
Registration information: You can keep different tax, check, and bank numbers here for future use.
2.9 Deleting all Company Transactions
All of a Company's transactions (orders and invoices) can be deleted. Use with caution because erased transactions cannot be retrieved.
Requirements
- The user must be an administrator.
- The User must have founded the Company.
Steps
- Under Manage, select the Delete Transactions button.
- Check your password.
- Type in the business name to confirm.
You're done now. The master data, including those for items, accounts, employees, and BOM, will stay the same.
What is affected?
- The deletion of Sales/Purchase Orders/Invoices/Receipts/Notes Sales history
- monthly sales will be erased.
- All alerts will be removed.
- Lead addresses connected to the Company will be removed.
- All correspondence pertaining to the Company will be erased.
- The naming series will all be changed.
- Stock Entries connected to this Company's Warehouses will be removed
Introduced in Version 13.
2.10 Change Parent Company
An existing firm's parent company can be changed. Save the form after choosing the Company from the list in the Parent Company area.
Company Setup
gues edited 2 years agoA company is a type of legal entity created by a group of people to operate a business or industrial venture.
When a Geer ERP account is set up, the first Company is created in Geer ERP. Depending on the nature of your business activity, you can select a manufacturing, retail, or services domain for each Company.
If you have more than one company, you can add them from:
Home > Accounting > Company
1. How to create a new Company
- Click New from the Company list.
- Enter the company's name, shorthand, and default currency.
- Save.
Your company's acronym is generated by default. FT for Frappe Technologies, as an illustration. The acronym makes it easier to distinguish between the assets of various businesses.
The acronym can also be found in your company's numerous accounts, cost centers, tax templates, warehouse, etc.
Additionally, you can include a company description and company logo.
1.1 Multi Company Structure
Assume you are the manager of a group of businesses, some of which may be smaller and some of which may be larger and are a part of the larger business (s).
You can create several companies in Geer ERP. The organizational structure of the business may be parallel, consisting of sister firms, parent-child enterprises, or both.
A parent company is a bigger business that includes one or more kid businesses. Subsidiary of a parent firm is a child company.
The overall organization of your firms is seen in the company tree view.
Geer ERP will verify whether the accounts of the child firms match the accounts of the parent company when you establish a company tree. A consolidated chart of accounts statement may be created by combining all the accounts.
1.2 Other Options when Creating a Company
Domain: The industry in which the business operates. For instance, manufacturing, services, etc. When creating your account, select one. - If this box is checked, the entity becomes a group. - If this is a child company, choose the parent from this field by choosing the group company that this firm is a part of. - If a parent company is chosen, it will be used to produce the chart of accounts for the new firm you are creating.
1.3 Chart of Accounts
The master for the Chart of Accounts is kept individually for each Company. This enables you to keep separate accounts for each business in accordance with the law. Using the Charts Of Accounts Importer, you may also import a chart of accounts.
For some nations, localized Charts of Accounts are easily accessible using Geer ERP. You can select one of the following choices when setting up the chart of accounts for a new company.
- Based on the existing company's chart of accounts,
- the standard chart of accounts
1.4 Defaults
Many of the default values for masters and accounts can be set in the Company master. With the value for the account being pulled from the Company master if provided, these default accounts will assist you in the speedy posting of accounting transactions. A default Chart of Accounts and Cost Center are automatically established as soon as the company is created.
For a business, the following defaults can be set:
Standard Working Hours
- Default Letter Head
- Default Holiday List
- Terms & Conditions of
- Default
- Country
- Tax ID
- Establishment Date
2. Features
2.1 Monthly Sales Target
Set the monthly sales goal at, say, $10,000 in the company's currency. Once transactions have been performed, the monthly total sales will be displayed. To learn more, go here.
2.2 Account Settings
Some of the following accounts will be set by default when you create a new company, others can be created. The accounts can be seen in the Chart of Accounts. These values can be changed later on if needed.
- Round Off Account
- Round Off Cost Center
- Default Bank Account
- Default Cash Account
- Default Receivable Account
- Write Off Account
- Discount Received Account
- Exchange Gain/Loss Account
- Unrealized Account
- Discount Allowed Account for Exchange Gain/Loss
- Account for Payable Defaults
- Account for Employee Advances
- Account for Cost of Goods Template for Sold Account
- Default Income Account
- Sold Account
- Default Deferred Revenue Account
- Sold Account
- Default Deferred Expense Account
- Sold Account
- Default Payroll Payable Account
- Sold Account
- Default Expense Claim Payable Account
- Sold Account
- Default Cost Center Credit Limit.
2.3 Stock Settings
The perpetual inventory feature would cause stock transactions to have an effect on the company's financial records. Find out more here. It is by default turned on.
Adjustment to - Default Inventory Account - Costs Associated With Valuation Included Account - Stock Received But Not Billed
2.4 Fixed Asset Defaults
The following accounts are required by a firm to manage its fixed assets. The majority of them will already be created. In the Chart of Accounts, they are depicted.
- Depreciation expense from the accumulated depreciation account
- Account Series for the Entry of Asset Depreciation (Journal Entry)
- Costs Added to Asset Valuation
- Gain/Loss Account
- on Asset Sale
- Depreciation of Assets
- Asset Received But Not Billed
- Account for Capital Work in Progress at the Cost Center
Check the Enable Finance Books box and choose a default finance book if you want to book your accounting transactions against various finance books.
2.5 HRA Settings
The following Salary Components should have their default component set.
Setting the default number in this section will assist Indian users with employee tax declaration calculations, particularly for calculating the HRA exemption amount.
- Basic Element
- Component of HRA
- component of arrears
2.6 Bank Remittance Settings
for only India.
One document of transfer can be used for several bank transfers by using the Payment Order feature (in Accounts). You can create bank remittance in a format that can be accepted and that can also be submitted on the bank's portal by updating the values in the following fields.
A user can combine many payment entries or payment requests into a single document by using payment order. A user can send a single document to the bank via Bank Remittance in text format. This text format can then be manually uploaded to the Kotak Bank Payments Platform.
You received client and product codes from the bank. This must be included in the text file in the manner required by Kotak Bank.
2.7 Budget
Role for Exceptional Budget Approver: This role has the authority to approve expenses regardless of the established budget.
2.8 Company Info
Geer ERP allows you to store the following information about your business for reference.
Registration Information: - Date of Incorporation - Phone No. - Fax - Email - Website - Address
It's vital to check the "Is Your Company Address" box when entering the address below.
If a corporation has many locations in India, different addresses can be listed with various GSTIN numbers. If your business has locations in Mumbai, Delhi, and Bangalore, for instance, you'll need to add various addresses with various GSTIN numbers.
Registration information: You can keep different tax, check, and bank numbers here for future use.
2.9 Deleting all Company Transactions
All of a Company's transactions (orders and invoices) can be deleted. Use with caution because erased transactions cannot be retrieved.
Requirements
- The user must be an administrator.
- The User must have founded the Company.
Steps
- Under Manage, select the Delete Transactions button.
- Check your password.
- Type in the business name to confirm.
You're done now. The master data, including those for items, accounts, employees, and BOM, will stay the same.
What is affected?
- The deletion of Sales/Purchase Orders/Invoices/Receipts/Notes Sales history
- monthly sales will be erased.
- All alerts will be removed.
- Lead addresses connected to the Company will be removed.
- All correspondence pertaining to the Company will be erased.
- The naming series will all be changed.
- Stock Entries connected to this Company's Warehouses will be removed
Introduced in Version 13.
2.10 Change Parent Company
An existing firm's parent company can be changed. Save the form after choosing the Company from the list in the Parent Company area.
Setting Up Taxes
Taxes are compulsory contributions to the state/country revenue.
Setting Up Taxes
Taxes are compulsory contributions to the state/country revenue.
Tax calculation is one of the main drivers for the required usage of accounting tools. You can create customizable tax templates with ERPNext and use them for your sales and buy activities.
1. Tax Accounts
Go to: to find the tax accounts you want to use in the tax templates.
Home > Accounting > Chart of Accounts
Click on edit after choosing an account. For the account, choose "Tax" as the "Account Type."
2. Sales Taxes and Charges Template
For your sales transactions like sales orders and sales invoices, the Sales Taxes and Charges Template fetched taxes. For further information, see Sales Taxes and Charges Template.
3. Purchase Taxes and Charges Template
Taxes for your sales transactions, such as Purchase Order and Purchase Invoice, were fetched by the Purchase Taxes and Charges Template. To learn more, see Purchase Taxes and Charges Template.
4. Item Tax Template
An item or an item group are the only things to which the tax established in the item tax template applies. In place of the Sales/Purchase Tax Template, it is given preference. For further information, see Item Tax Template.
5. Tax Category
Based on the customer or supplier you've selected, tax category aids in applying sales/purchase tax templates automatically to your transactions. Learn more by reading Tax Category.
Setting Company Sales Goal
Defining and achieving sales goals/targets can help your company reach new goals and increase revenue.
A Company's monthly sales goals can be defined in the Sales Settings section of the Company master. The Company Master Dashboard by default shows past sales statistics broken down by month.

To monitor progress in relation to the graph, set the Sales Target field as follows:
In notifications, the target progress is also displayed:
Global Defaults
Default values for documents like Currency, Fiscal Year, etc, can be set from Global Defaults.
The default settings for various fields will be set for all users as a result of the values set here. Go to: to access Global Defaults.
Home > Settings > Global Defaults
Alternatively, use the search box.
These variables will be pre-set as defaults whenever a new document is created.
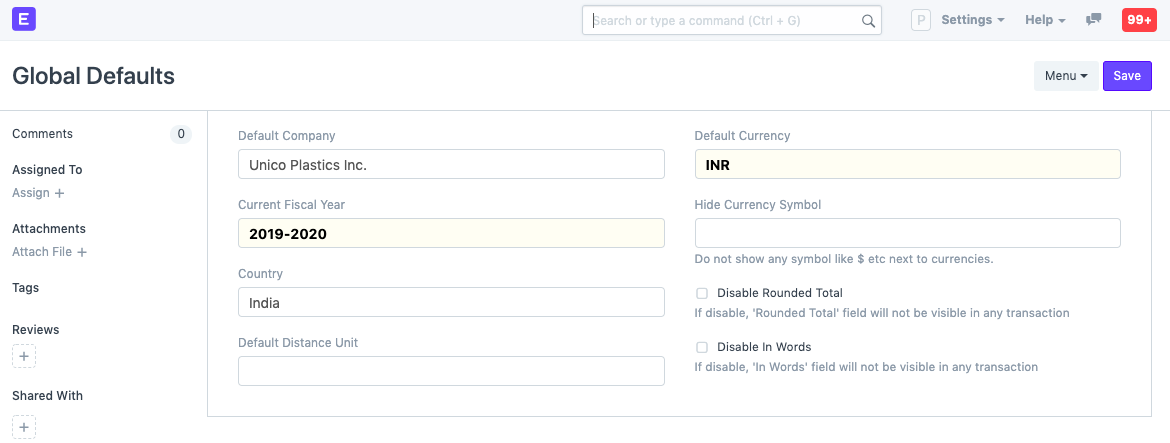
- Default Company
- Current Fiscal Year
- Country
- Default Distance Unit
- Default Currency
- Hide Currency Symbol
- Disable Rounded Total
- Disable In Words
The total distance in Delivery Trips is determined using the Default Distance Unit.
System Settings
System Setting contains settings for system-wide configuration of the account.
Through System Settings, you can localize Geer ERP to utilize a specific time zone, date, number, or currency format, as well as define the global session expiry.
Go to: to access System Settings.
Home > Settings > System Settings

1. Sections in System Settings
1.1 General
- Nation: The default country can be selected here and will be retrieved when creating new addresses. Pick the location of the head office if your organization has branches in many nations.
- Time zone: Automatically sets the time based on the time zone.
- Language: Controls the ERPNext account's default language. Then, all of the menus, transactions, masters, etc., will have new language.
1.2 Date and Number Format
- Date Format: The format used to show dates. Examples are dd.mm.yyyy or mm/dd/yyyy. Depending on how dates are presented in your area, this.
- Format for displaying time is called the time format. By changing the option to (HH:mm), you may decide whether to display (HH:mm:ss) or hide seconds.
- Number Format: The format used to format numbers. 1000.00 or 1,000, for instance. The quantity of zeros shown after the decimal point for amounts, etc. is known as the "float precision." The scale is 2 to 9. There is a 3.
- Currency Precision: The number of zeros shown for currency values following the decimal point. If left empty, the Number Format will be used.
- Day One of the Week: This can be used to set the day for the beginning of the week. The calendar view, date selection layout, and dynamic filters for week used in list and report views are all impacted by this.
1.3 Backups
You may backup both your files and your database with Geer ERP. While file backups must be specifically downloaded, database backups are automatically made.
The number of backups after which previous ones will be erased is displayed in this field. Three backups are saved by default every 24 hours. Every few hours, backups are automatically produced, and the most recent backup replaces the oldest. Click the Download Files Backup button in the Download Backups form to download a backup of your files.
It's a good idea to regularly backup your system in case something goes wrong and you need to roll back, or even just for your records.
1.4 Permissions
You can restrict user access to different document kinds by using permissions. The restriction may be determined by fields such as Company, Territory, Branch, etc. Click here for additional information about user permissions.
The user will not be able to see any documents with blank link values if the Apply Strict User Permissions checkbox is selected and user permission is configured for a DocType for that user.
This is accomplished by:
Home > Users and Permissions > Permissions > User Permissions
For instance: If you select India as the value for User Permissions for Territory. All transactions (sales orders, quotations) with India and blank will be displayed to users if the checkbox is left unticked.
When the Apply Strict User Permissions checkbox is selected, users will not be able to see documents if the Territory field is empty.
1.5 Security
- Session Expiry: Number of idle hours after which you'll be logged out of a session. This helps in better security. For example, if there is no activity for 6 hours, your account will be logged out.
- Session Expiry Mobile: Session expiry when logged in from a mobile phone.
- Document Share Key Expiry (in Days): Number of days after which "document web link" sent via email will be expired.
- Allow only one session per user: If you want to use a single set of credentials for multiple users, tick this checkbox. The number of simultaneous sessions can be changed under User master. Mobile phone sessions are not counted here.
Allow Login using Mobile Number: By checking the 'Allow Login using Mobile Number' checkbox, you can log in to ERPNext using a valid mobile number set in your User account.
Allow Login using User Name: Allow user login via their username set in the User master.
Show Full Error and Allow Reporting of Issues to the Developer: This will display the whole error on the screen and allow reporting issues. If you have technical knowledge in this area, you can get a better idea of the error by reading the whole message.
- Remove EXIF tags from uploaded images: Metadata stored in image files in the EXIF file format can be exploited to get sensitive user information. This option lets users remove that data from the images before uploading.
- Allow Older Web View Links (Insecure): The configuration that allows web links with no expiry. Note: Older web links (generated in v13) are considered to be insecure as they had no expiry. It is recommended to keep this configuration unchecked.
1.6 Password
- Force User to Reset Password: Number of days after which a password reset is mandatory. 0 means no limit.
- Enable Password Policy: Enables a password strength checker so that users have to use strong passwords for their login.
Minimum Password Score: Score for the password strength checker
2 is medium
- 3 is strong
- 4 is very strong
Character count, capitalization, special characters, etc. are all factors that affect complexity.
Reset Password Link Expiry Duration: This configuration is used to set the duration after which the newly created reset rassword link gets expired. The default expiry for reset password link is 20 minutes. Setting it to "0 Seconds" disables the "Reset Password Link Expiry" functionality.
Password Reset Link Generation Limit: Using this configuration the limit for number of password reset requests per hour can be set. The default limit is 3. Setting it to 0 will allow unlimited password reset link generation requests.
1.7 Brute Force Security
- Allow Consecutive Login Attempts: Consecutive logins after which you'll be locked out of the account for a specific period. This helps if an intruder tries to log in to your account.
- Allow Login After Fail: Seconds after which a login attempt will be allowed after consecutive unsuccessful attempts.
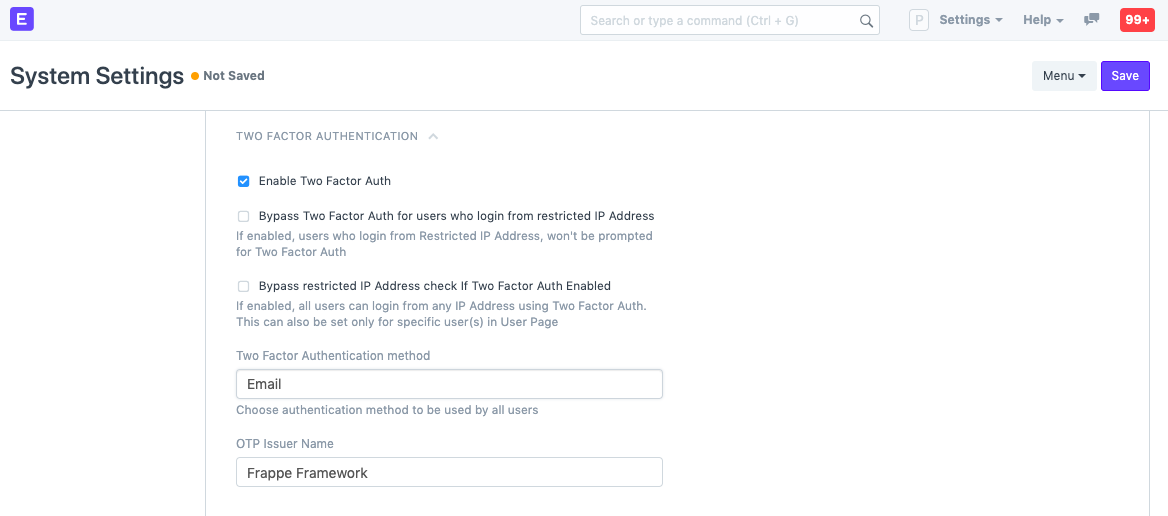
1.8 Two Factor Authentication
Here, you may adjust the two factor authentication settings.
The following two options will appear after selecting "Enable Two Factor Auth."
Bypass Two Factor Auth for users who log in from restricted IP Address: Users who log in from restricted IP addresses will not be asked for Two Factor Authentication. You can restrict IPs from User master under the Restrict IP field. Bypass restricted IP Address check If Two Factor Auth Enabled: If checked, all users can log in with Two Factor Authentication regardless if their IP is restricted or not.
Two Factor Authentication method: Select the authentication method to be used - OTP App, SMS, or email.
Expiry time of QR Code Image Page: Expiry time for QRCode image if "OTP App" is selected in the method. OTP Issuer Name of the One Time Password.
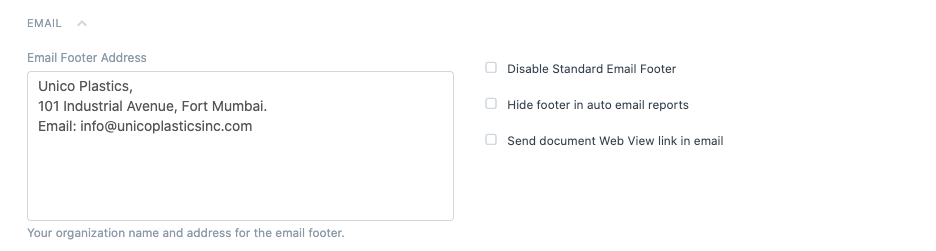
1.9 Email
Email Footer Address: Organization name, address, and other details can be added here. This will be set as default in all outgoing mails. Disable Standard Email Footer: If ticked, the standard email footer will be disabled for outgoing emails. Hide footer in auto-email reports: If ticked, footers will be hidden in Auto Email reports. Send document web view link in the email: ERPNext has a portal view available from where parties like Customers and Suppliers can sign up and view their order history. When you email a transaction to your party, you can also send a web link to view the same document on the portal of your ERPNext account. This option will enable this functionality.
1.10 Chat
- Enable Chat: This option will enable the in-app chat which can be used to communicate with other employees.
1.10 System Updates
- Disable System Update Notfication: This option disables all version update notfications triggered by the application.
Letter Head
A Letter Head contains your organization's name, logo, address, etc which appears at the top portion in documents.
Every business has a standard letterhead. In most documents, the Header and Footer values for Letter Head are set. These specifics can be included into the Letter Head master in Geer ERP.
Transactions like Sales Order, Sales Invoice, Salary Slip, Purchase Order, etc. would have these details in the Print Format. The Letter Head setting in Geer ERP only affects the top portion of the page; all remaining material is pre-formatted and can be customized using Print Format and Print Headings.
Go to: to access Letter Head.
Home > Settings > Letter Head
1. How to create a Letter Head
- Go to the Letter Head list, click on New.
- Enter a name for the Letter Head. You can create a separate Letter Head for different office locations.
- Choose whether based on image or HTML.
- You can enter details in a Letter Head by using:
- Logo Image: Click on the Attach button to attach an image. Once the image is inserted, HTML for it will be generated automatically.
- Other information (like Address, tax ID, etc.) that you want to put on your Letter Head.
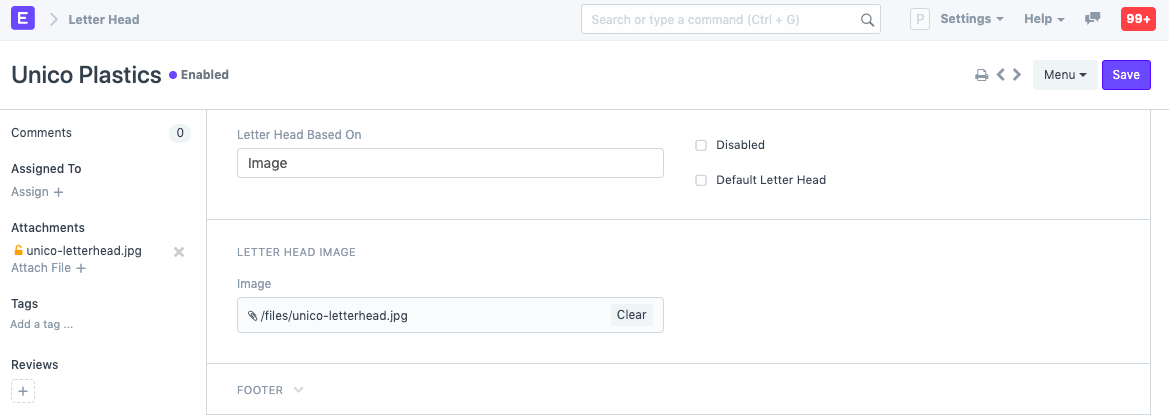
Click "Default Letter Head" to set this as the default letterhead.
- Save the Letter Head after entering values in the Header and Footer sections.
To make adjustments, you can set the Letter Head's HTML basis to:
This is how the Letter Head appears in printed documents.
.png)
Note that Footer will be visible only when the document's print is seen in the PDF. Footer will not be visible in the HTML based print preview.
Data Management
The Data Import Export Tool allows you to mass edit and import data from and into spreadsheet files (.csv). In the beginning, this tool will be quite beneficial for setting up your data from other systems.
Data Import Tool
The Data Import Tool lets you import records from a CSV/Excel file.
The Data Import Tool makes it simple to upload (or change) large quantities of data, particularly master data, into the system.
Go to: to start importing data.
Home > Data Import and Settings > Import Data
Alternatively, open the document you wish to import and select Menu > Import:
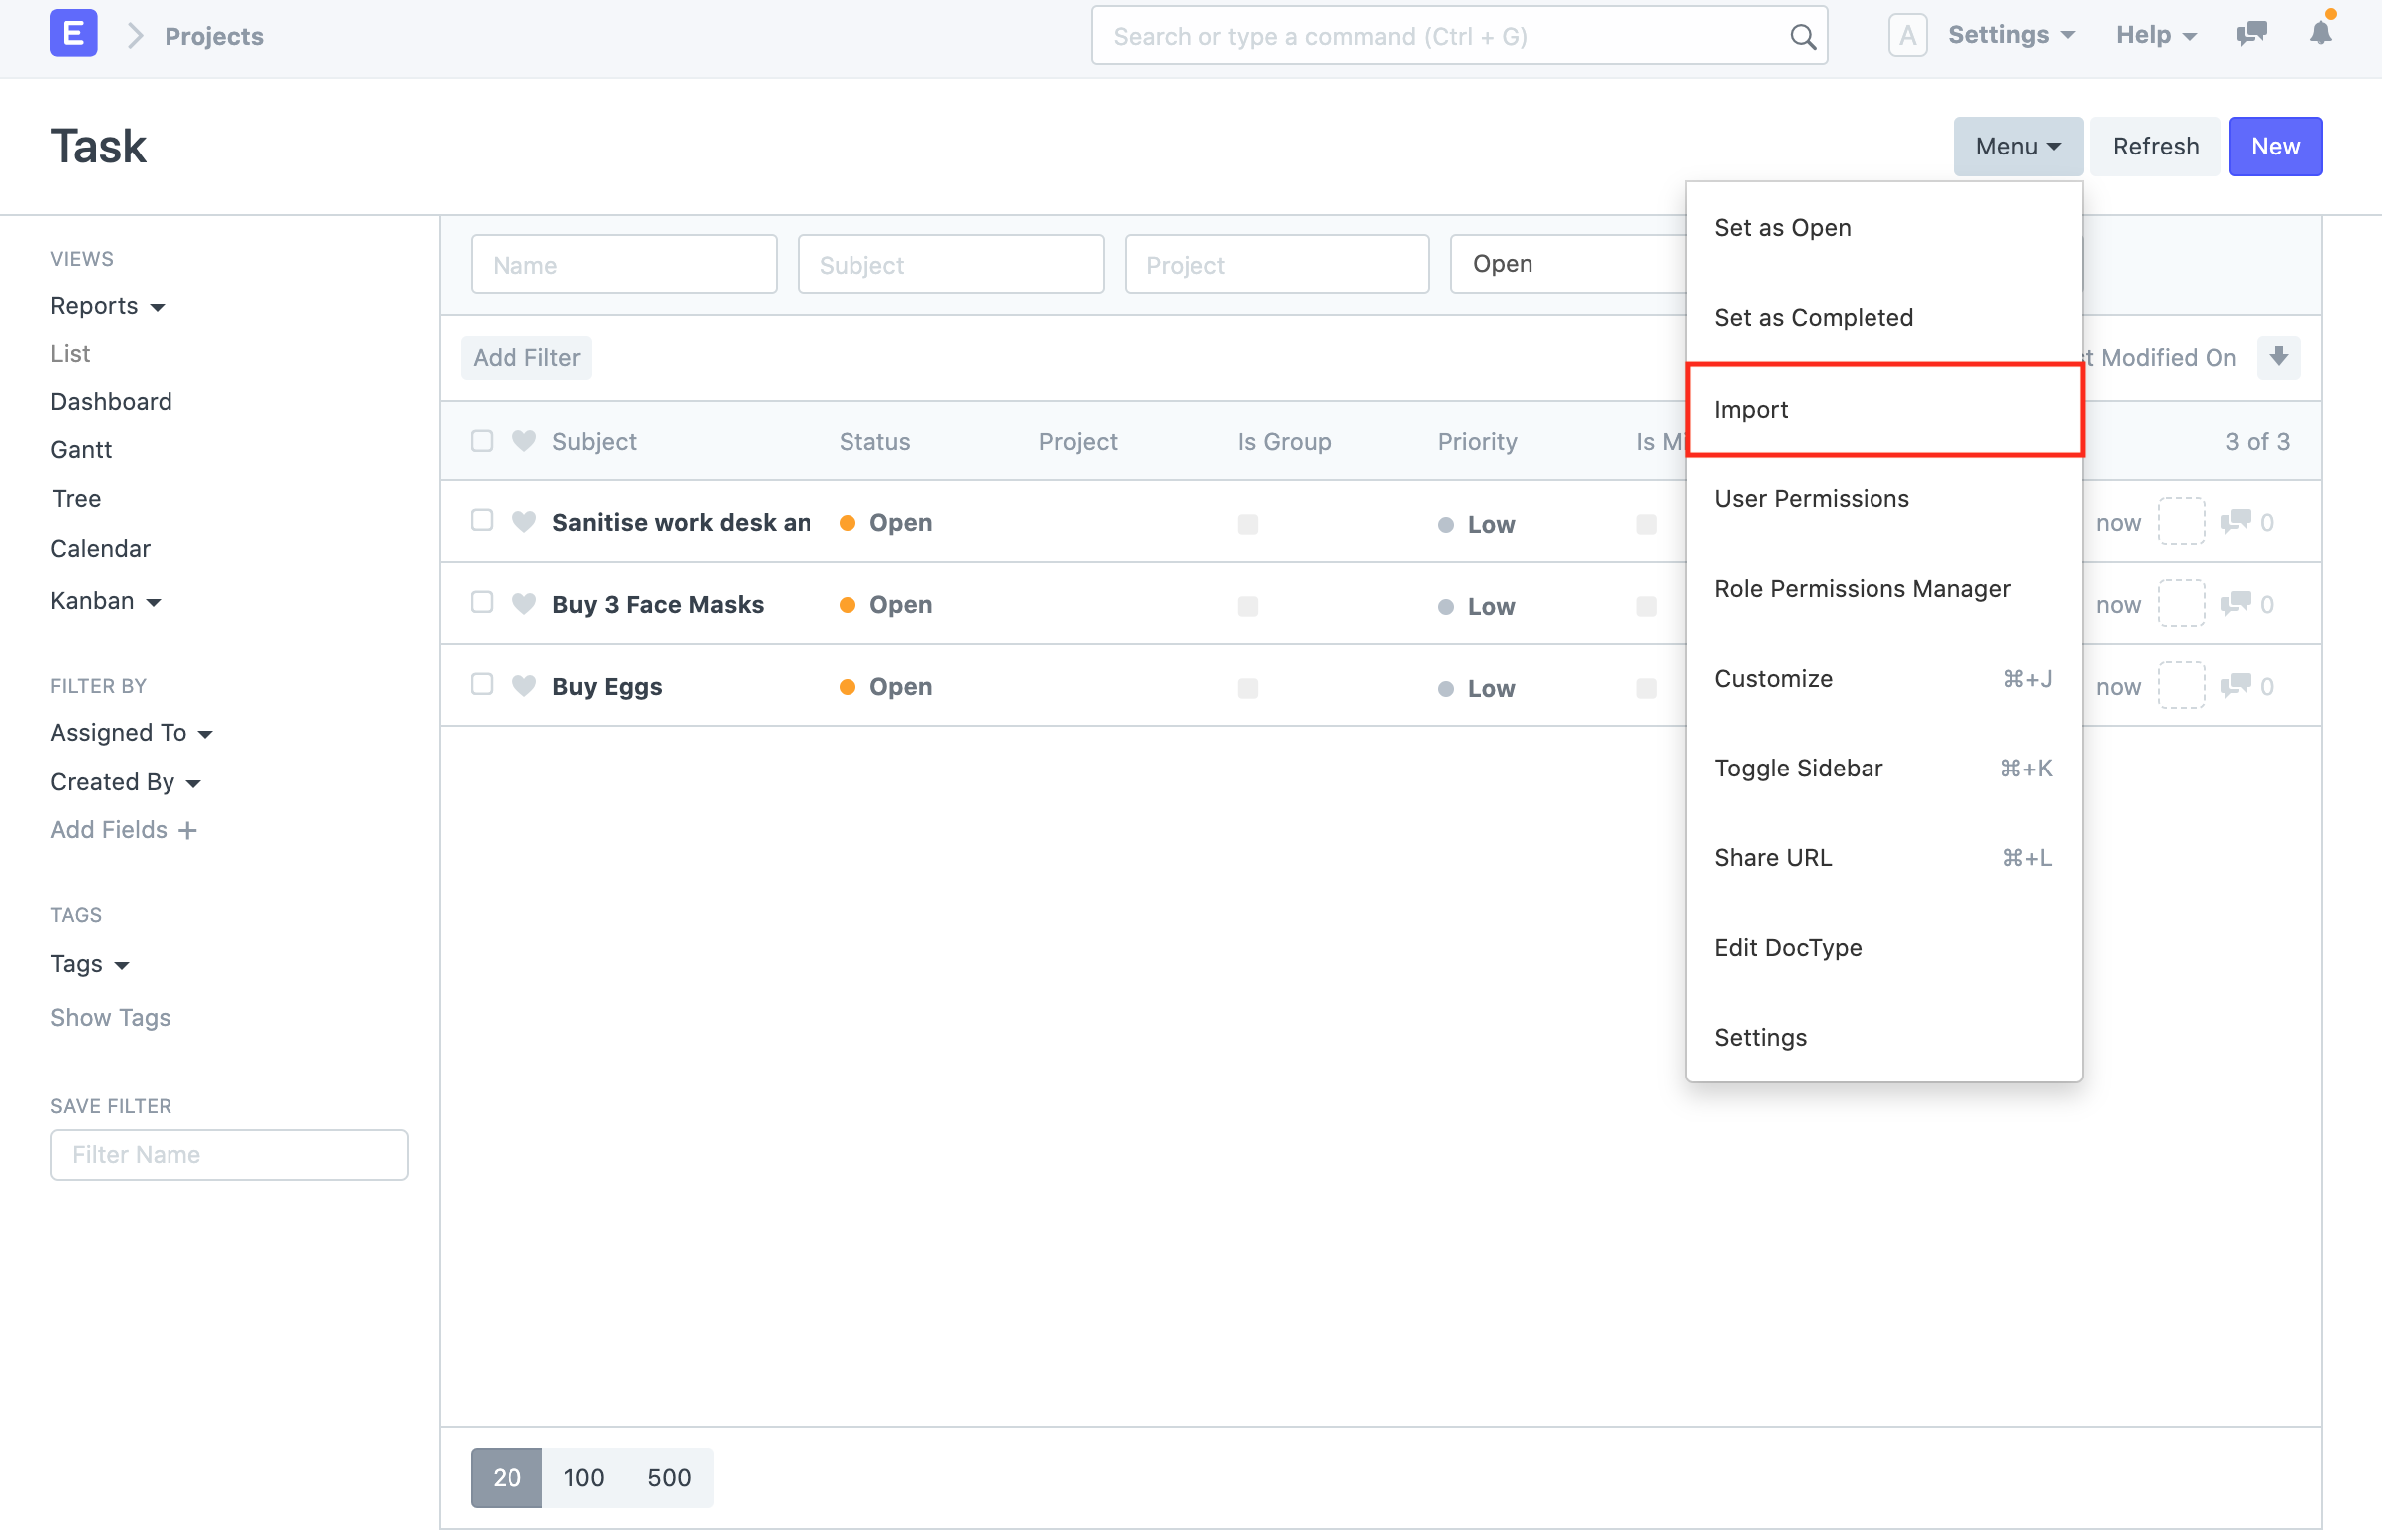
Make sure you have all of your data prepared before utilizing Data Import.
1. Inserting New Records
Imagine you wish to import your previous system's customer list into Geer ERP. Downloading a template into which we can input our data is the first step.
1.1 Download the Template
- Go to Customer List, click on Menu > Import. Click on New.
- Select Import Type as Insert New Records.
- Click on Save.
- Now, click on Download Template.
- While inserting new records, the template should be blank. If you have a few Customers in your system, you can select Export Type as "5 Records" to see the format in which you have to enter the data in the template.
- Select the File Type of the export template.
- Select the fields that you want to fill in as the Customer details.
- Click on Export.
1.2 Entering Data in the Template
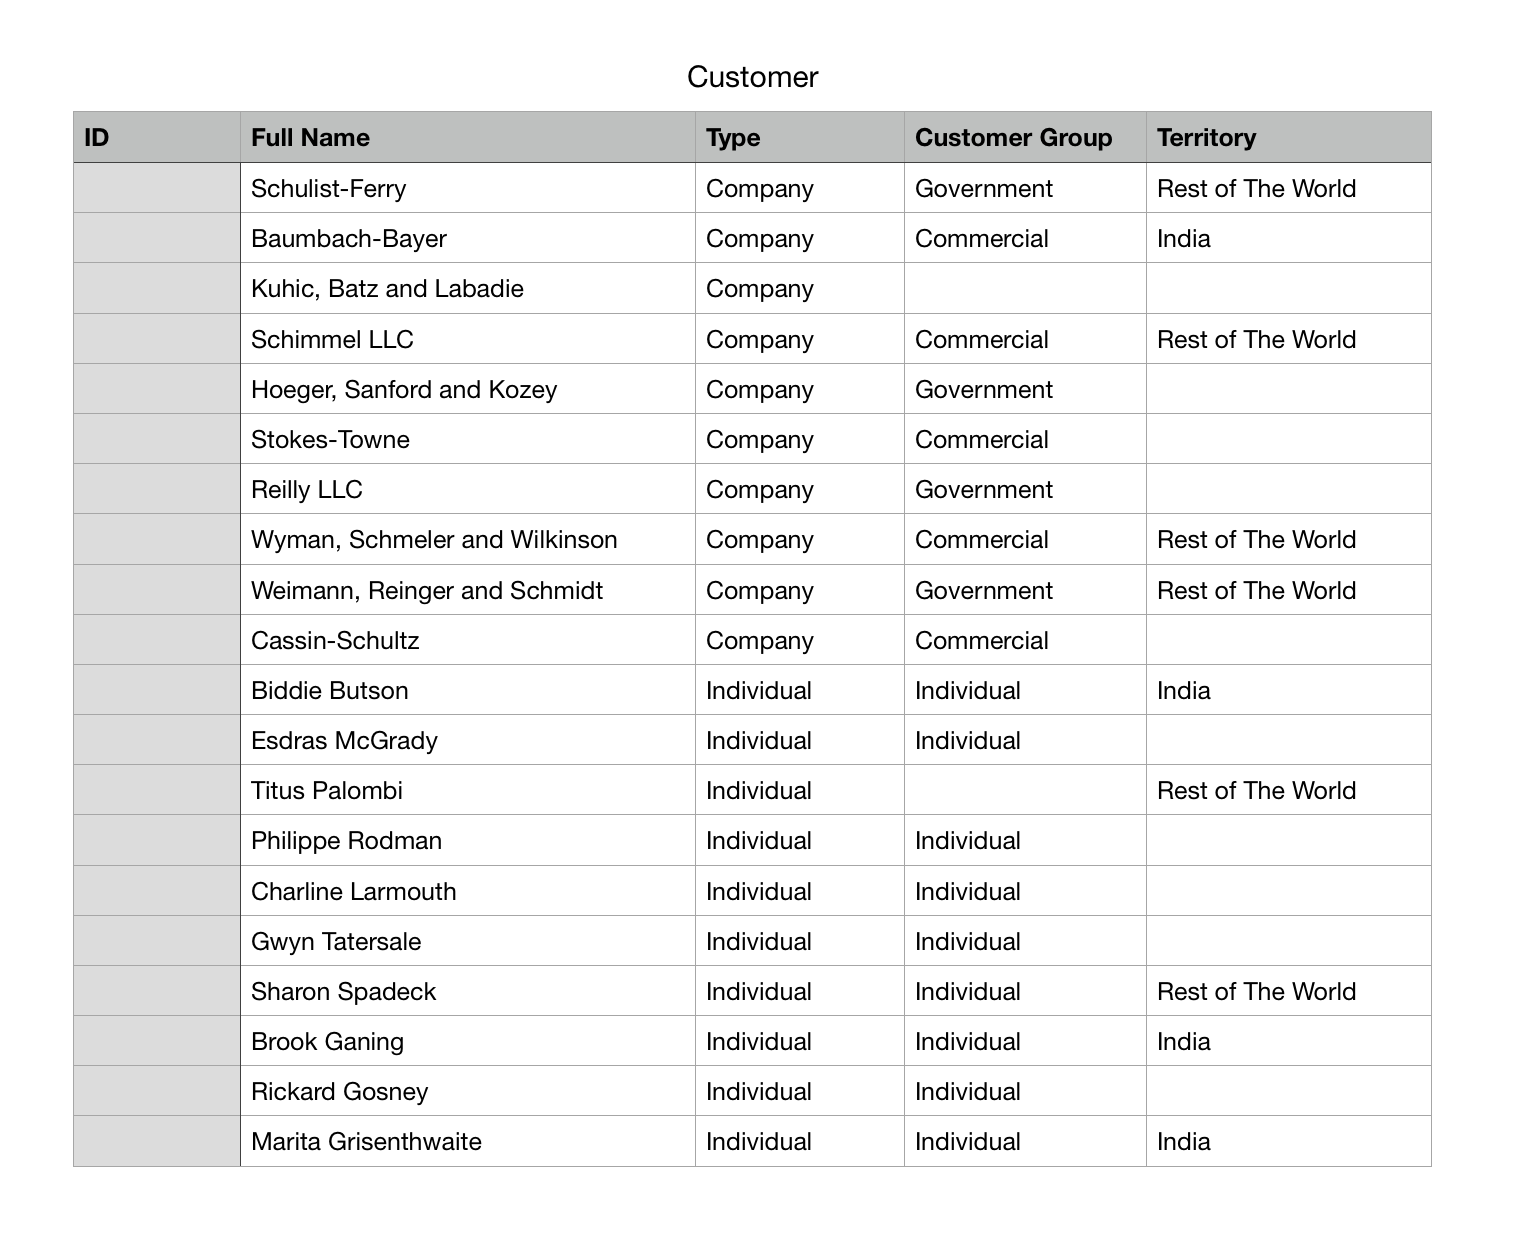
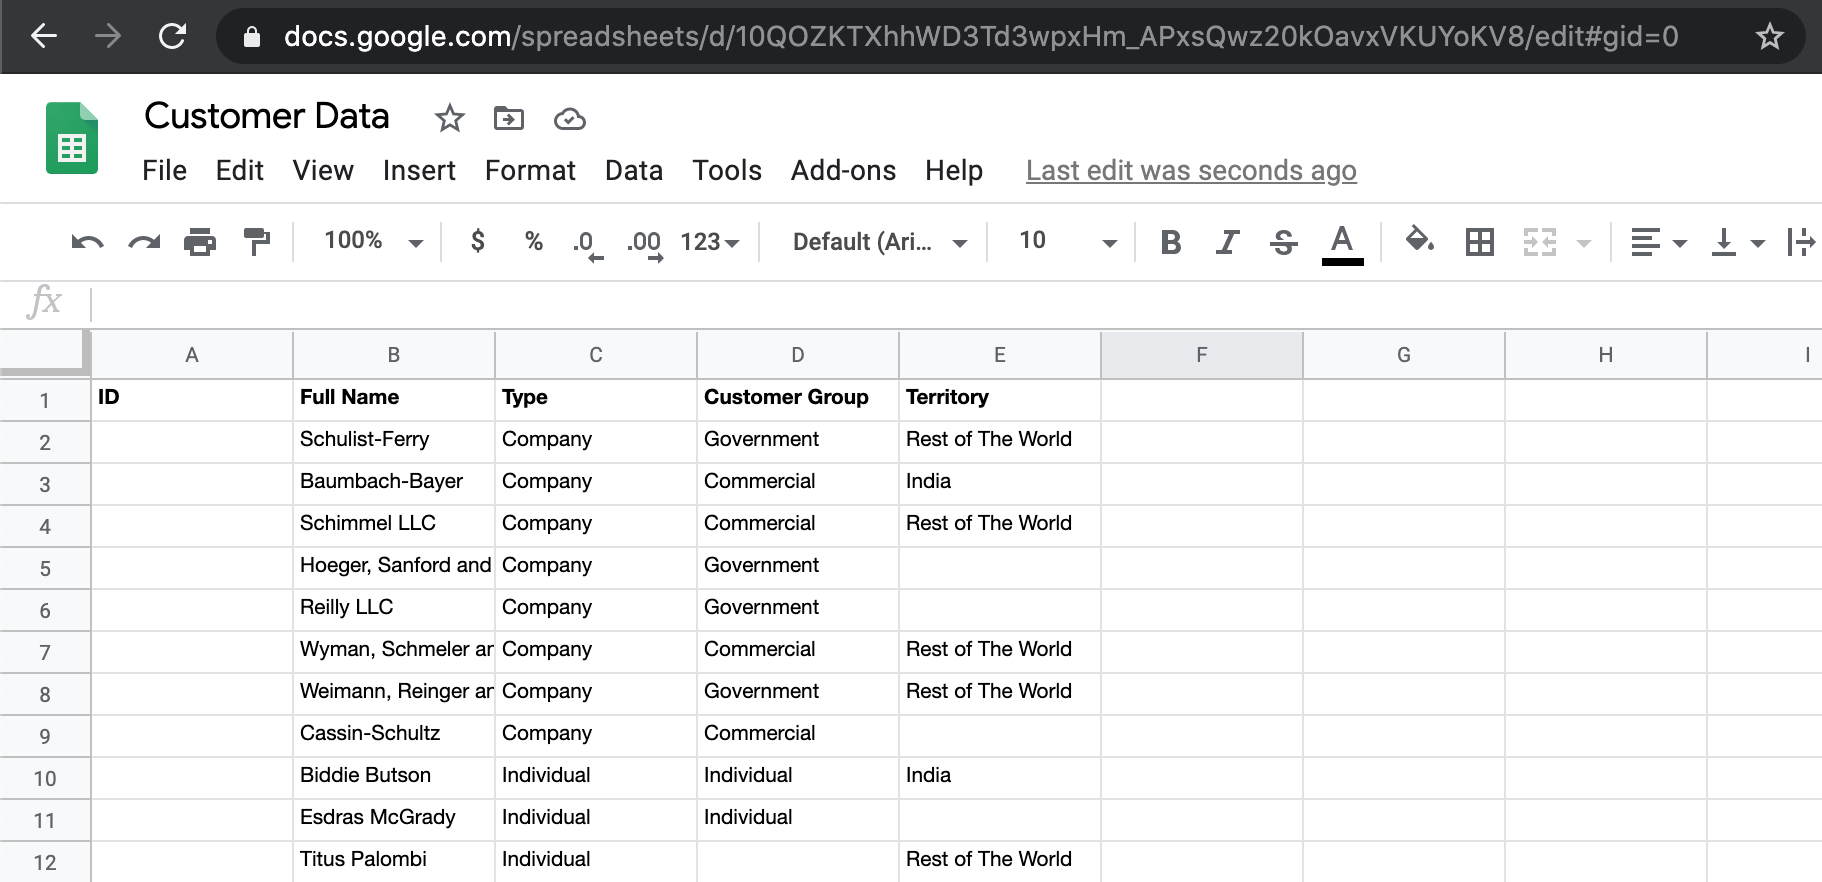
This is how your downloaded template will appear:

Open the downloaded template in a spreadsheet program (such as Libre Office, Numbers, or Excel) and add the information underneath the indicated column headers as follows:
In the following step, save your template as an Excel or CSV file.
You can leave the ID column as blank while inserting new records.
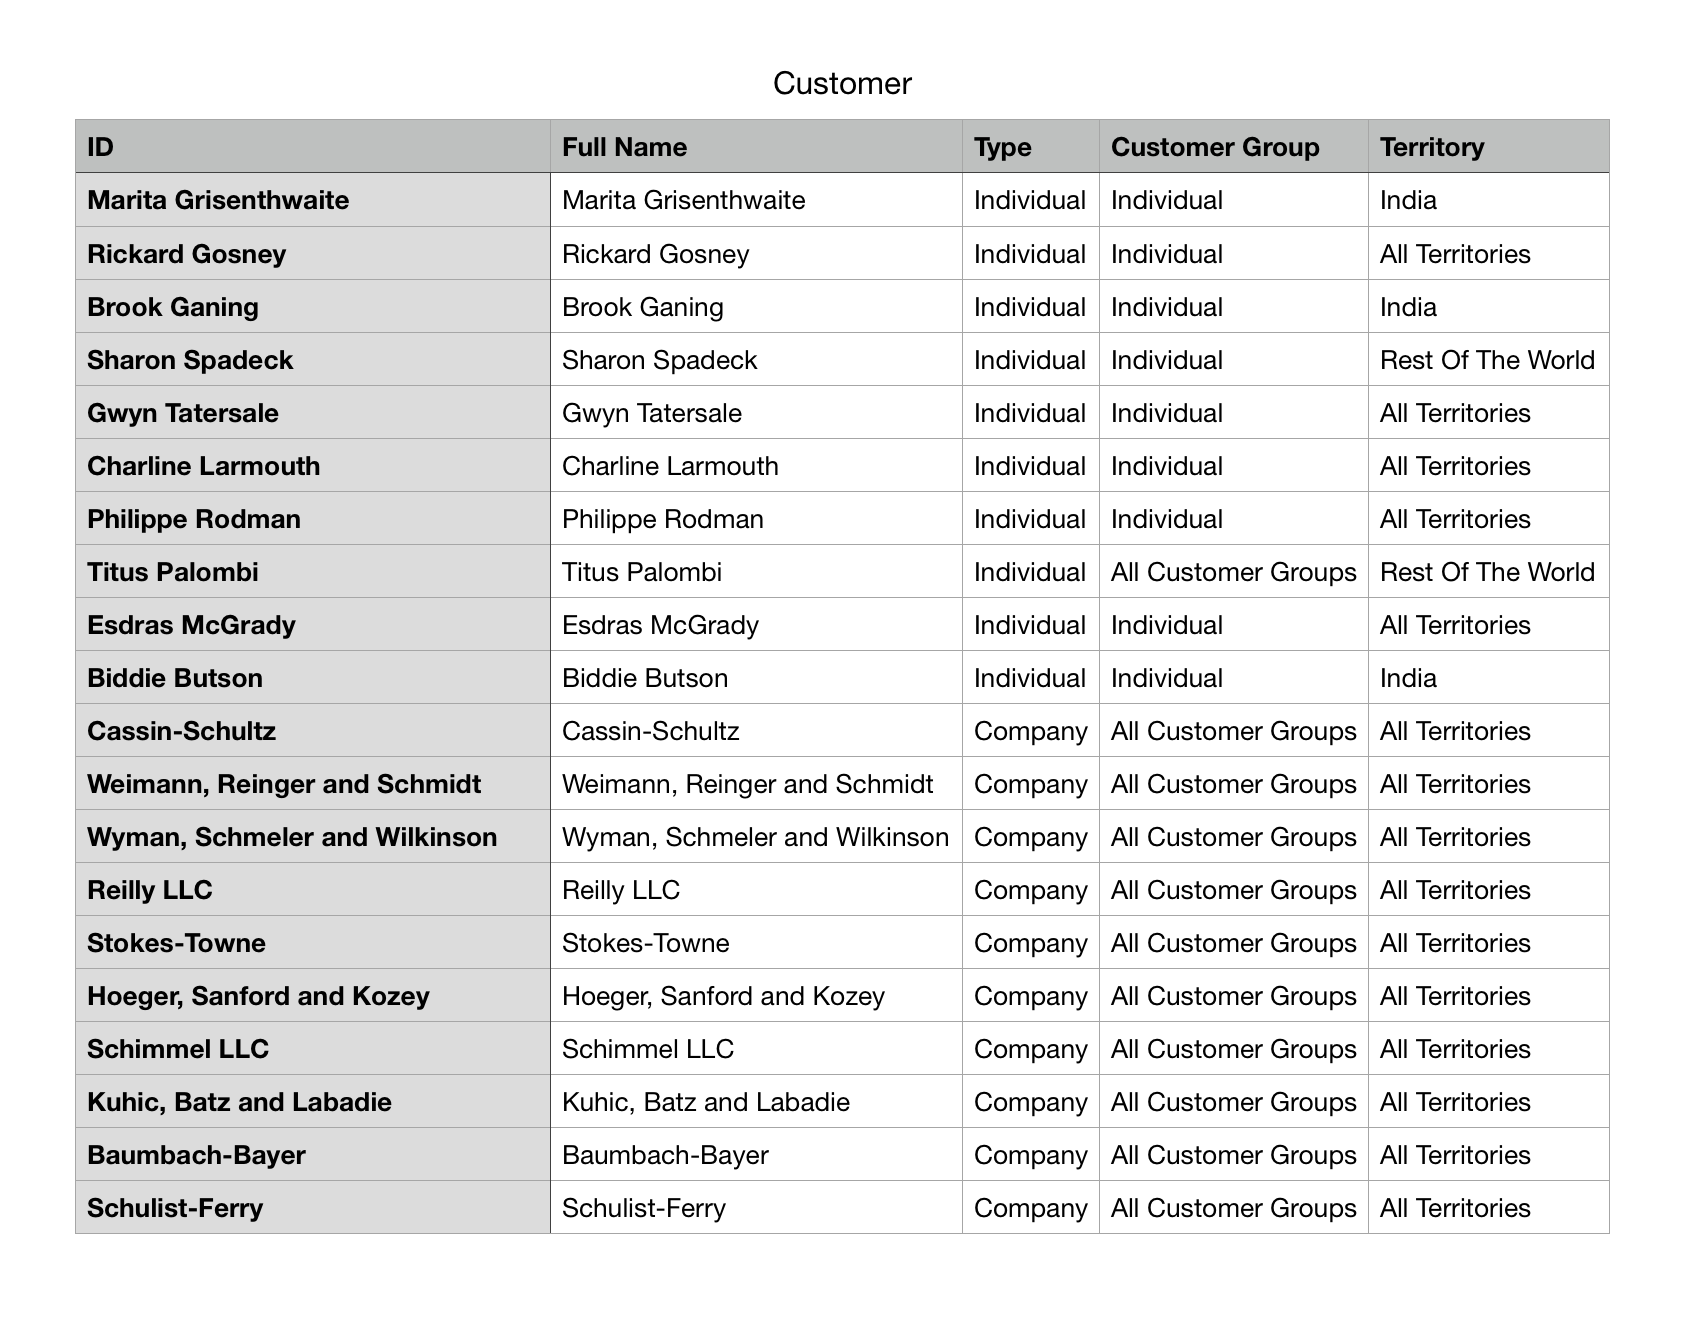
Each row will create a Customer record in the system when you import this template.
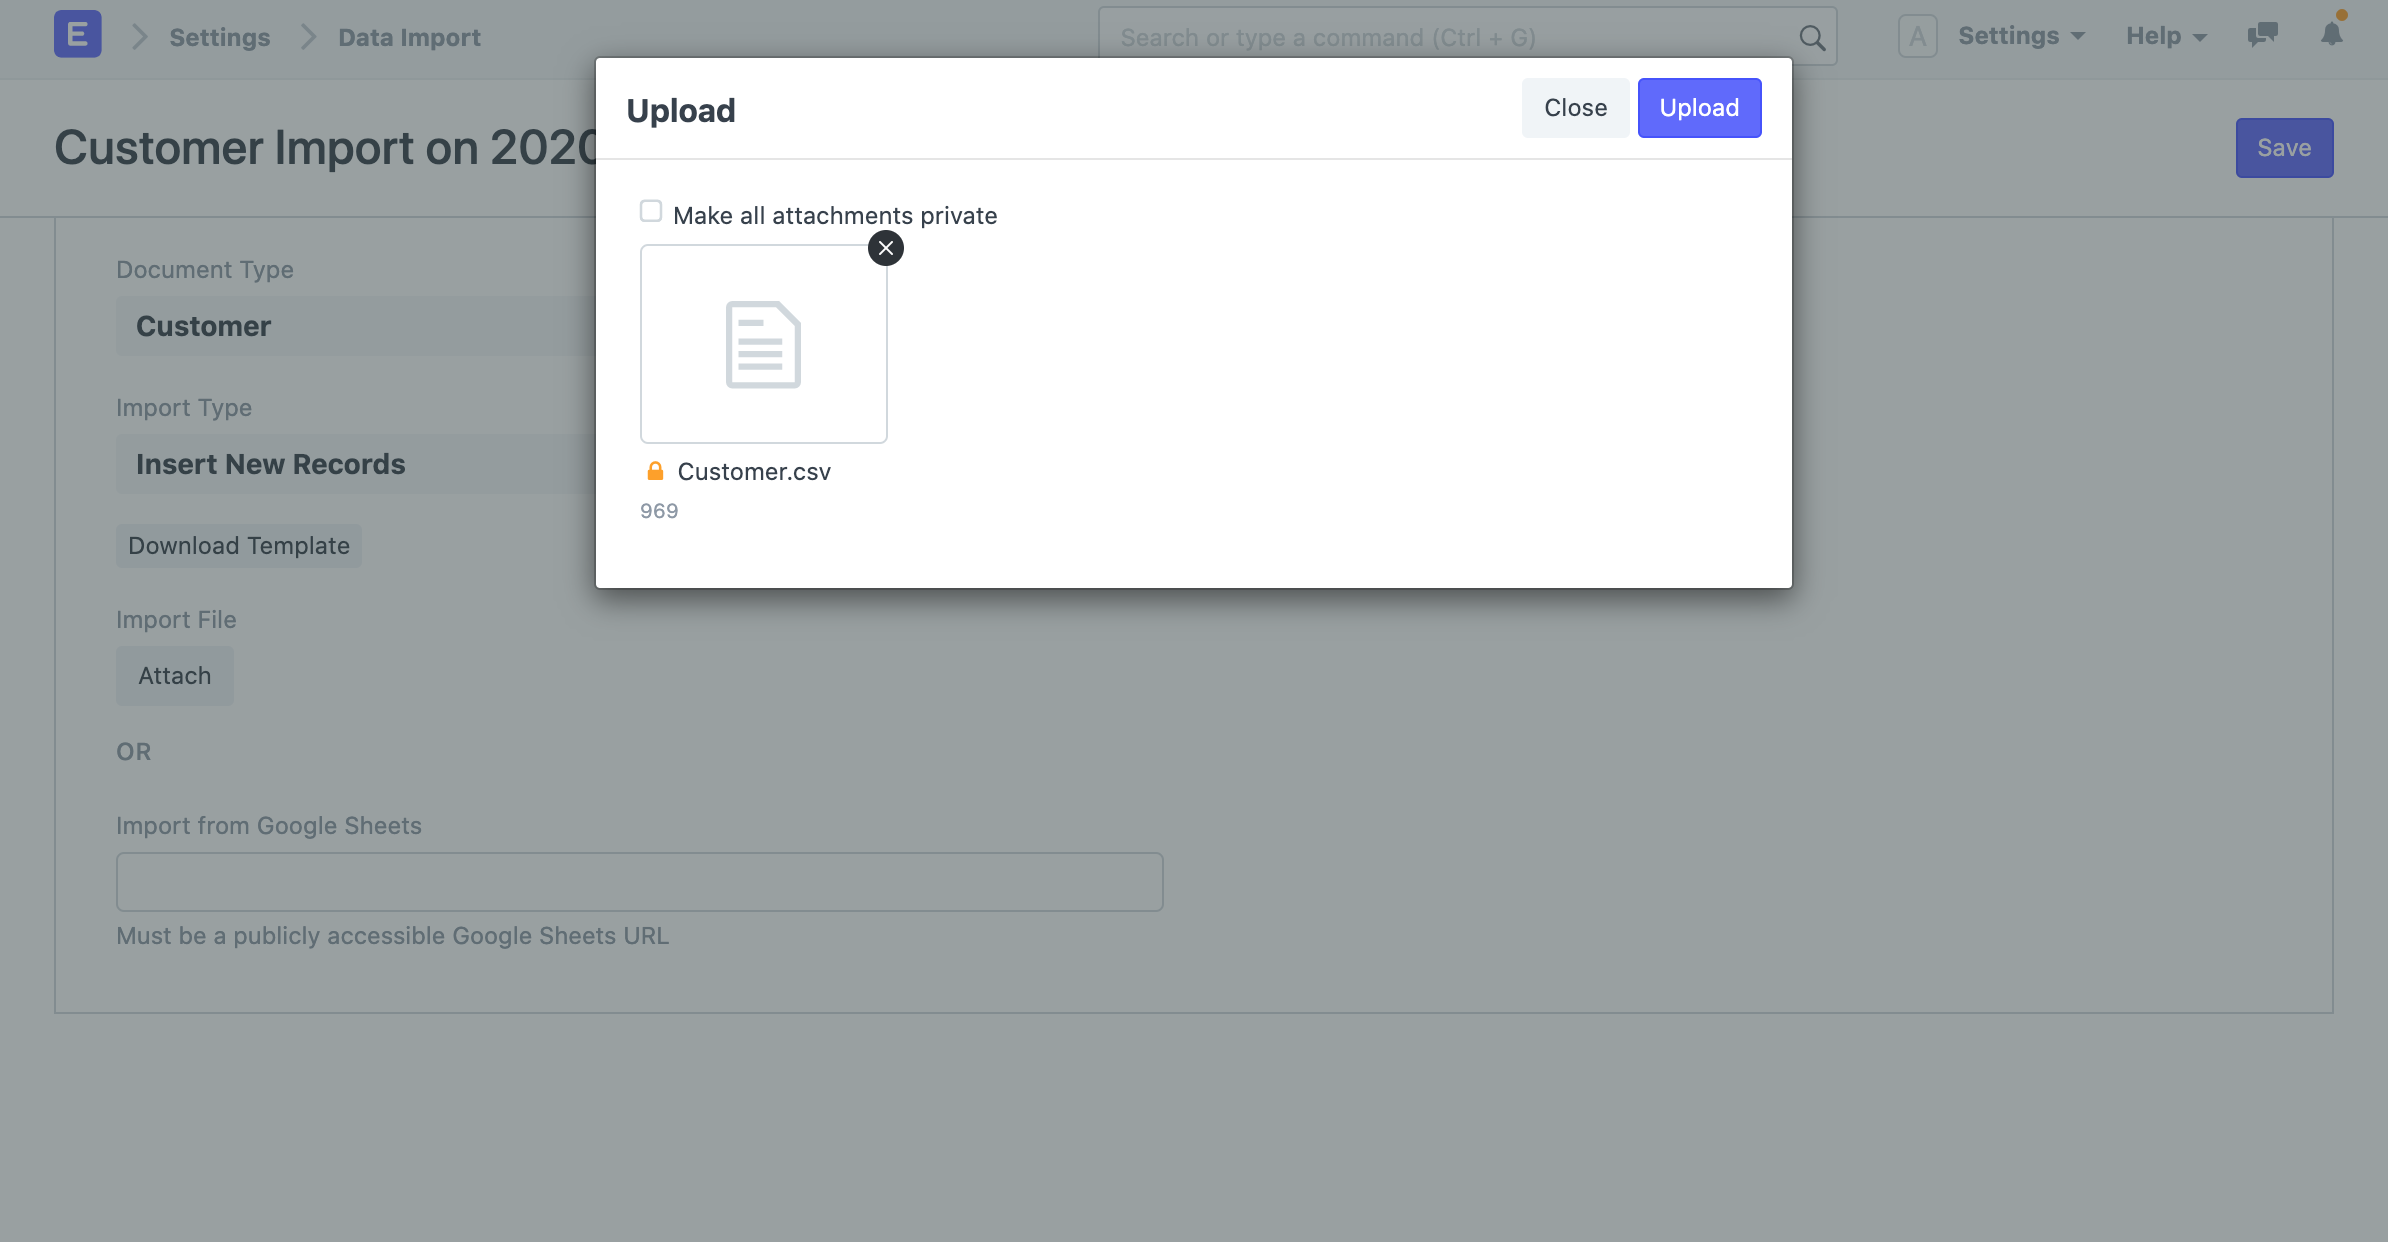
1.3 Importing the Template
1.After updating your template file, go back to the Data Import form and attach the file by clicking on the Attach button. 1. Select the template file and click on Upload. 1. After the upload is successful, click on Start Import.
 Your template's errors will be displayed in the Warnings section if there are any. To make it simple for you to locate and address the warnings in the template, they will be organized by Row or Column along with their corresponding number. Before you may import the data, all of the cautions must be addressed.
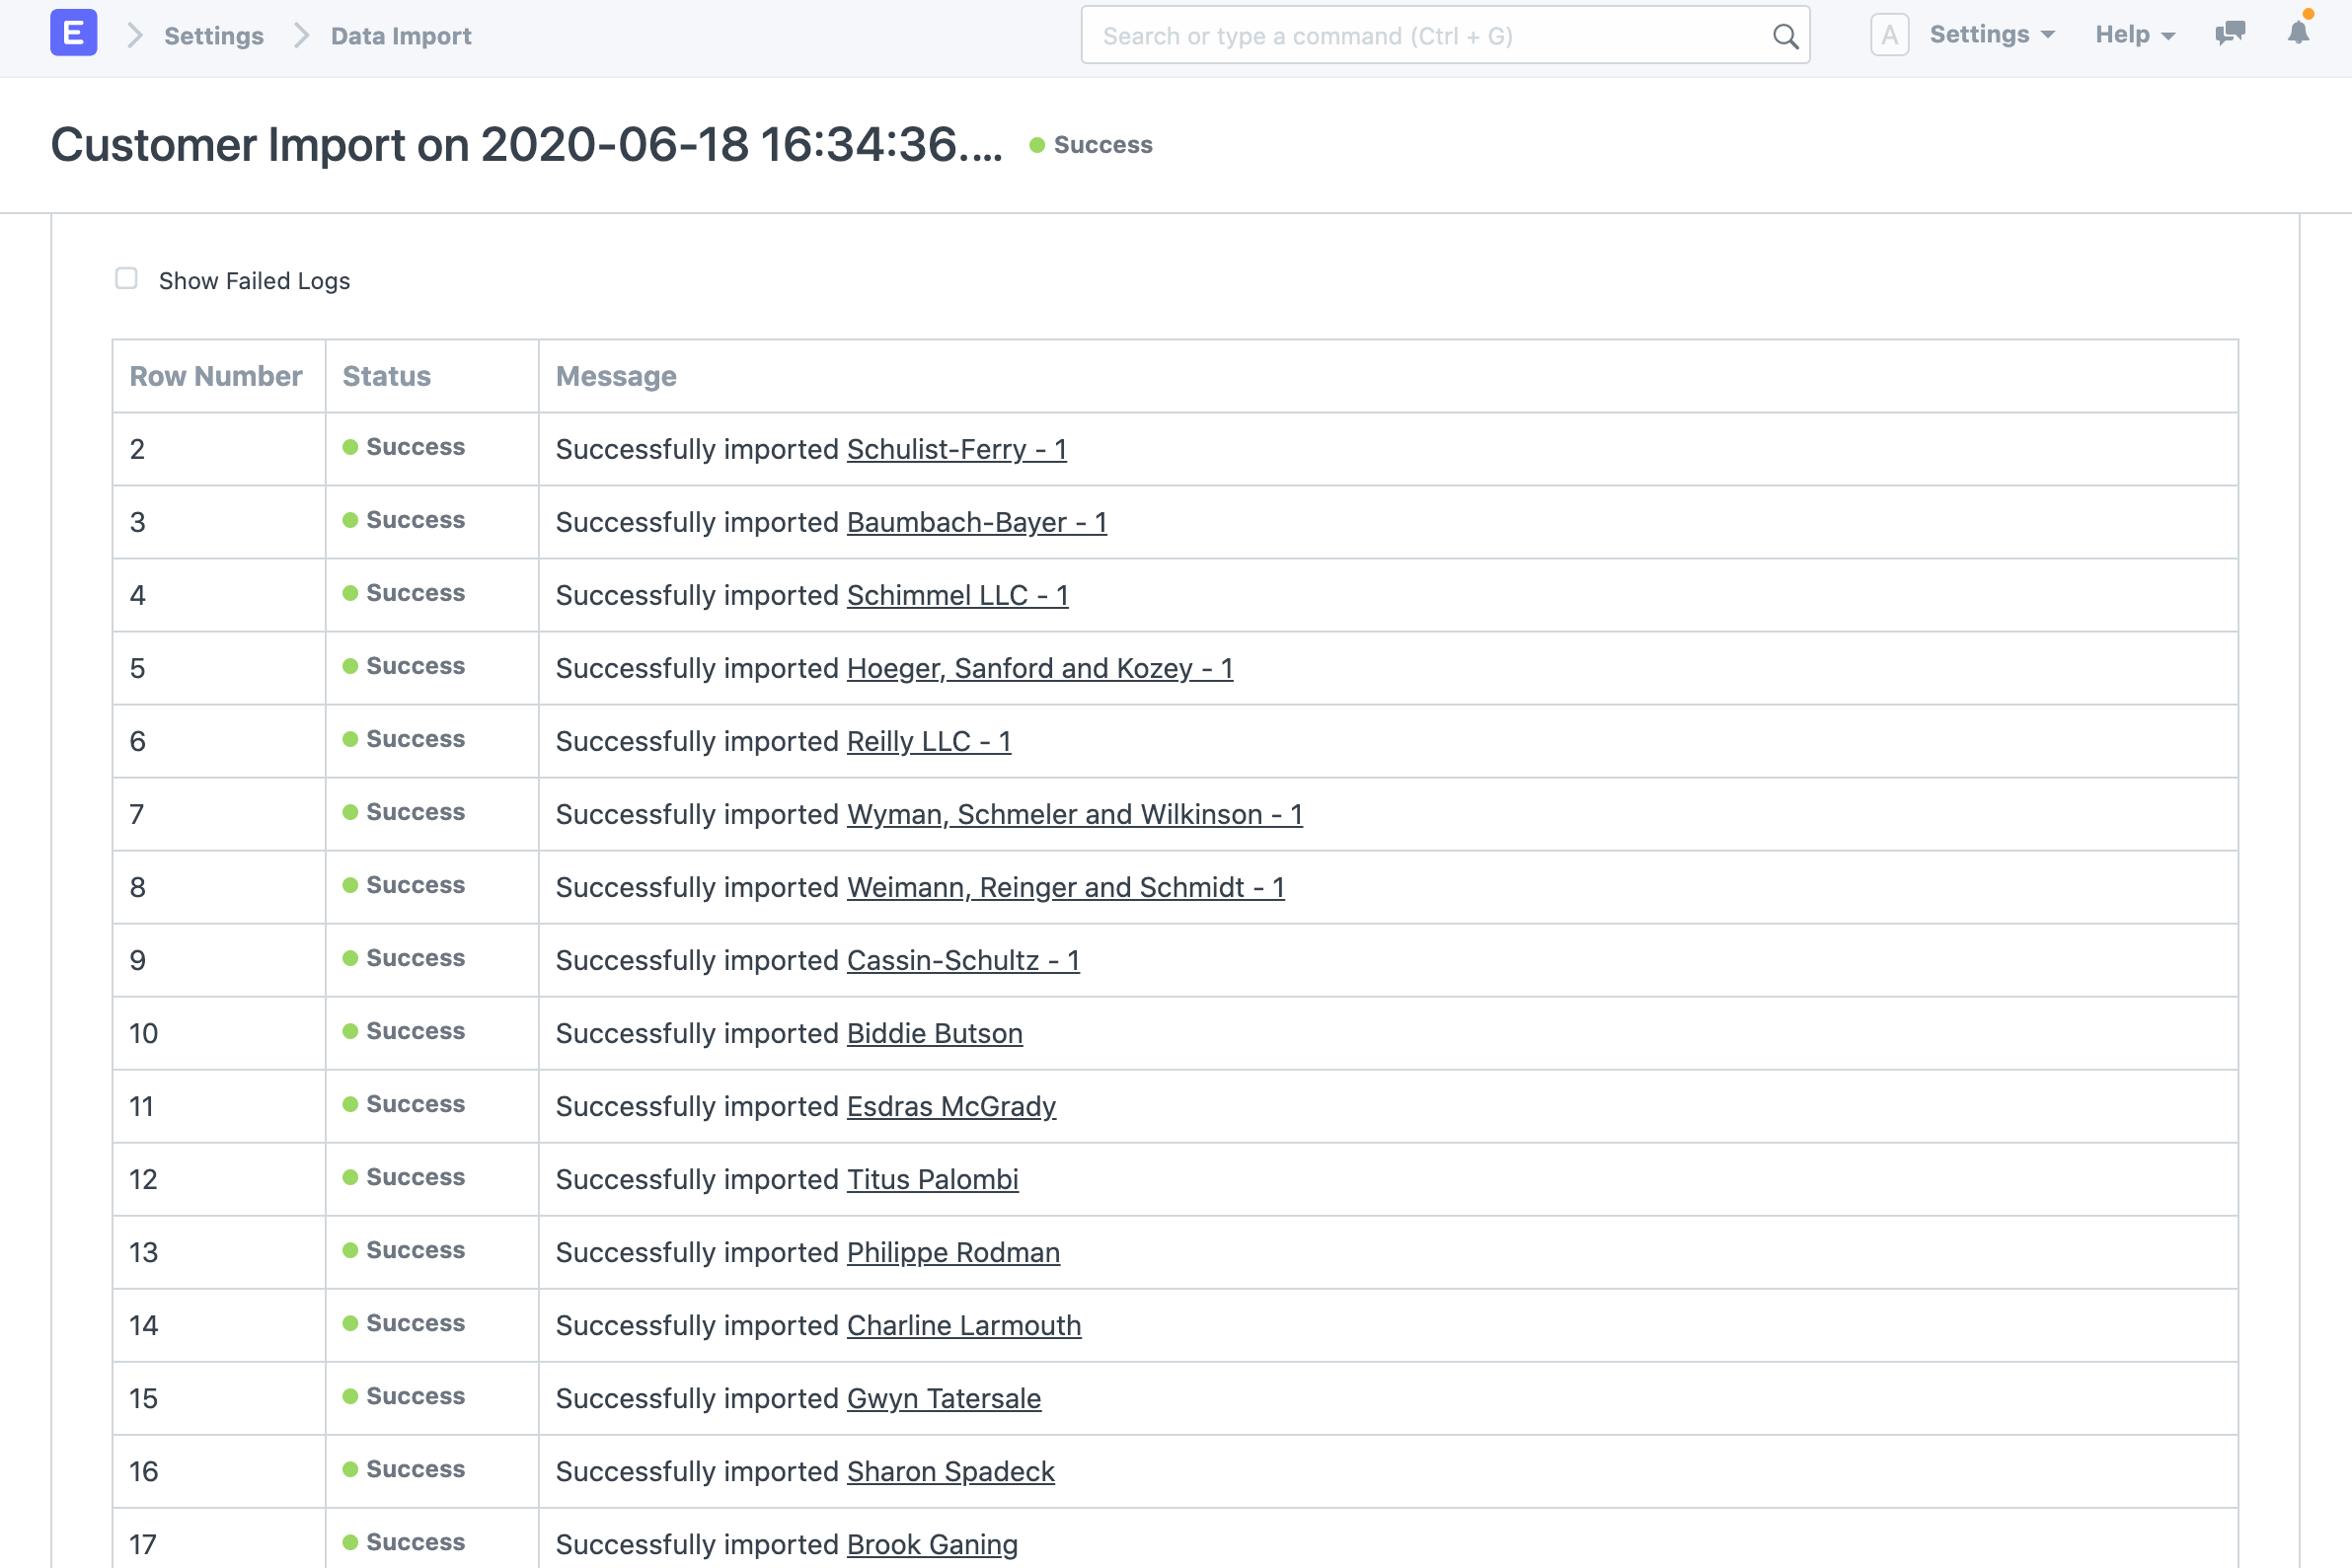
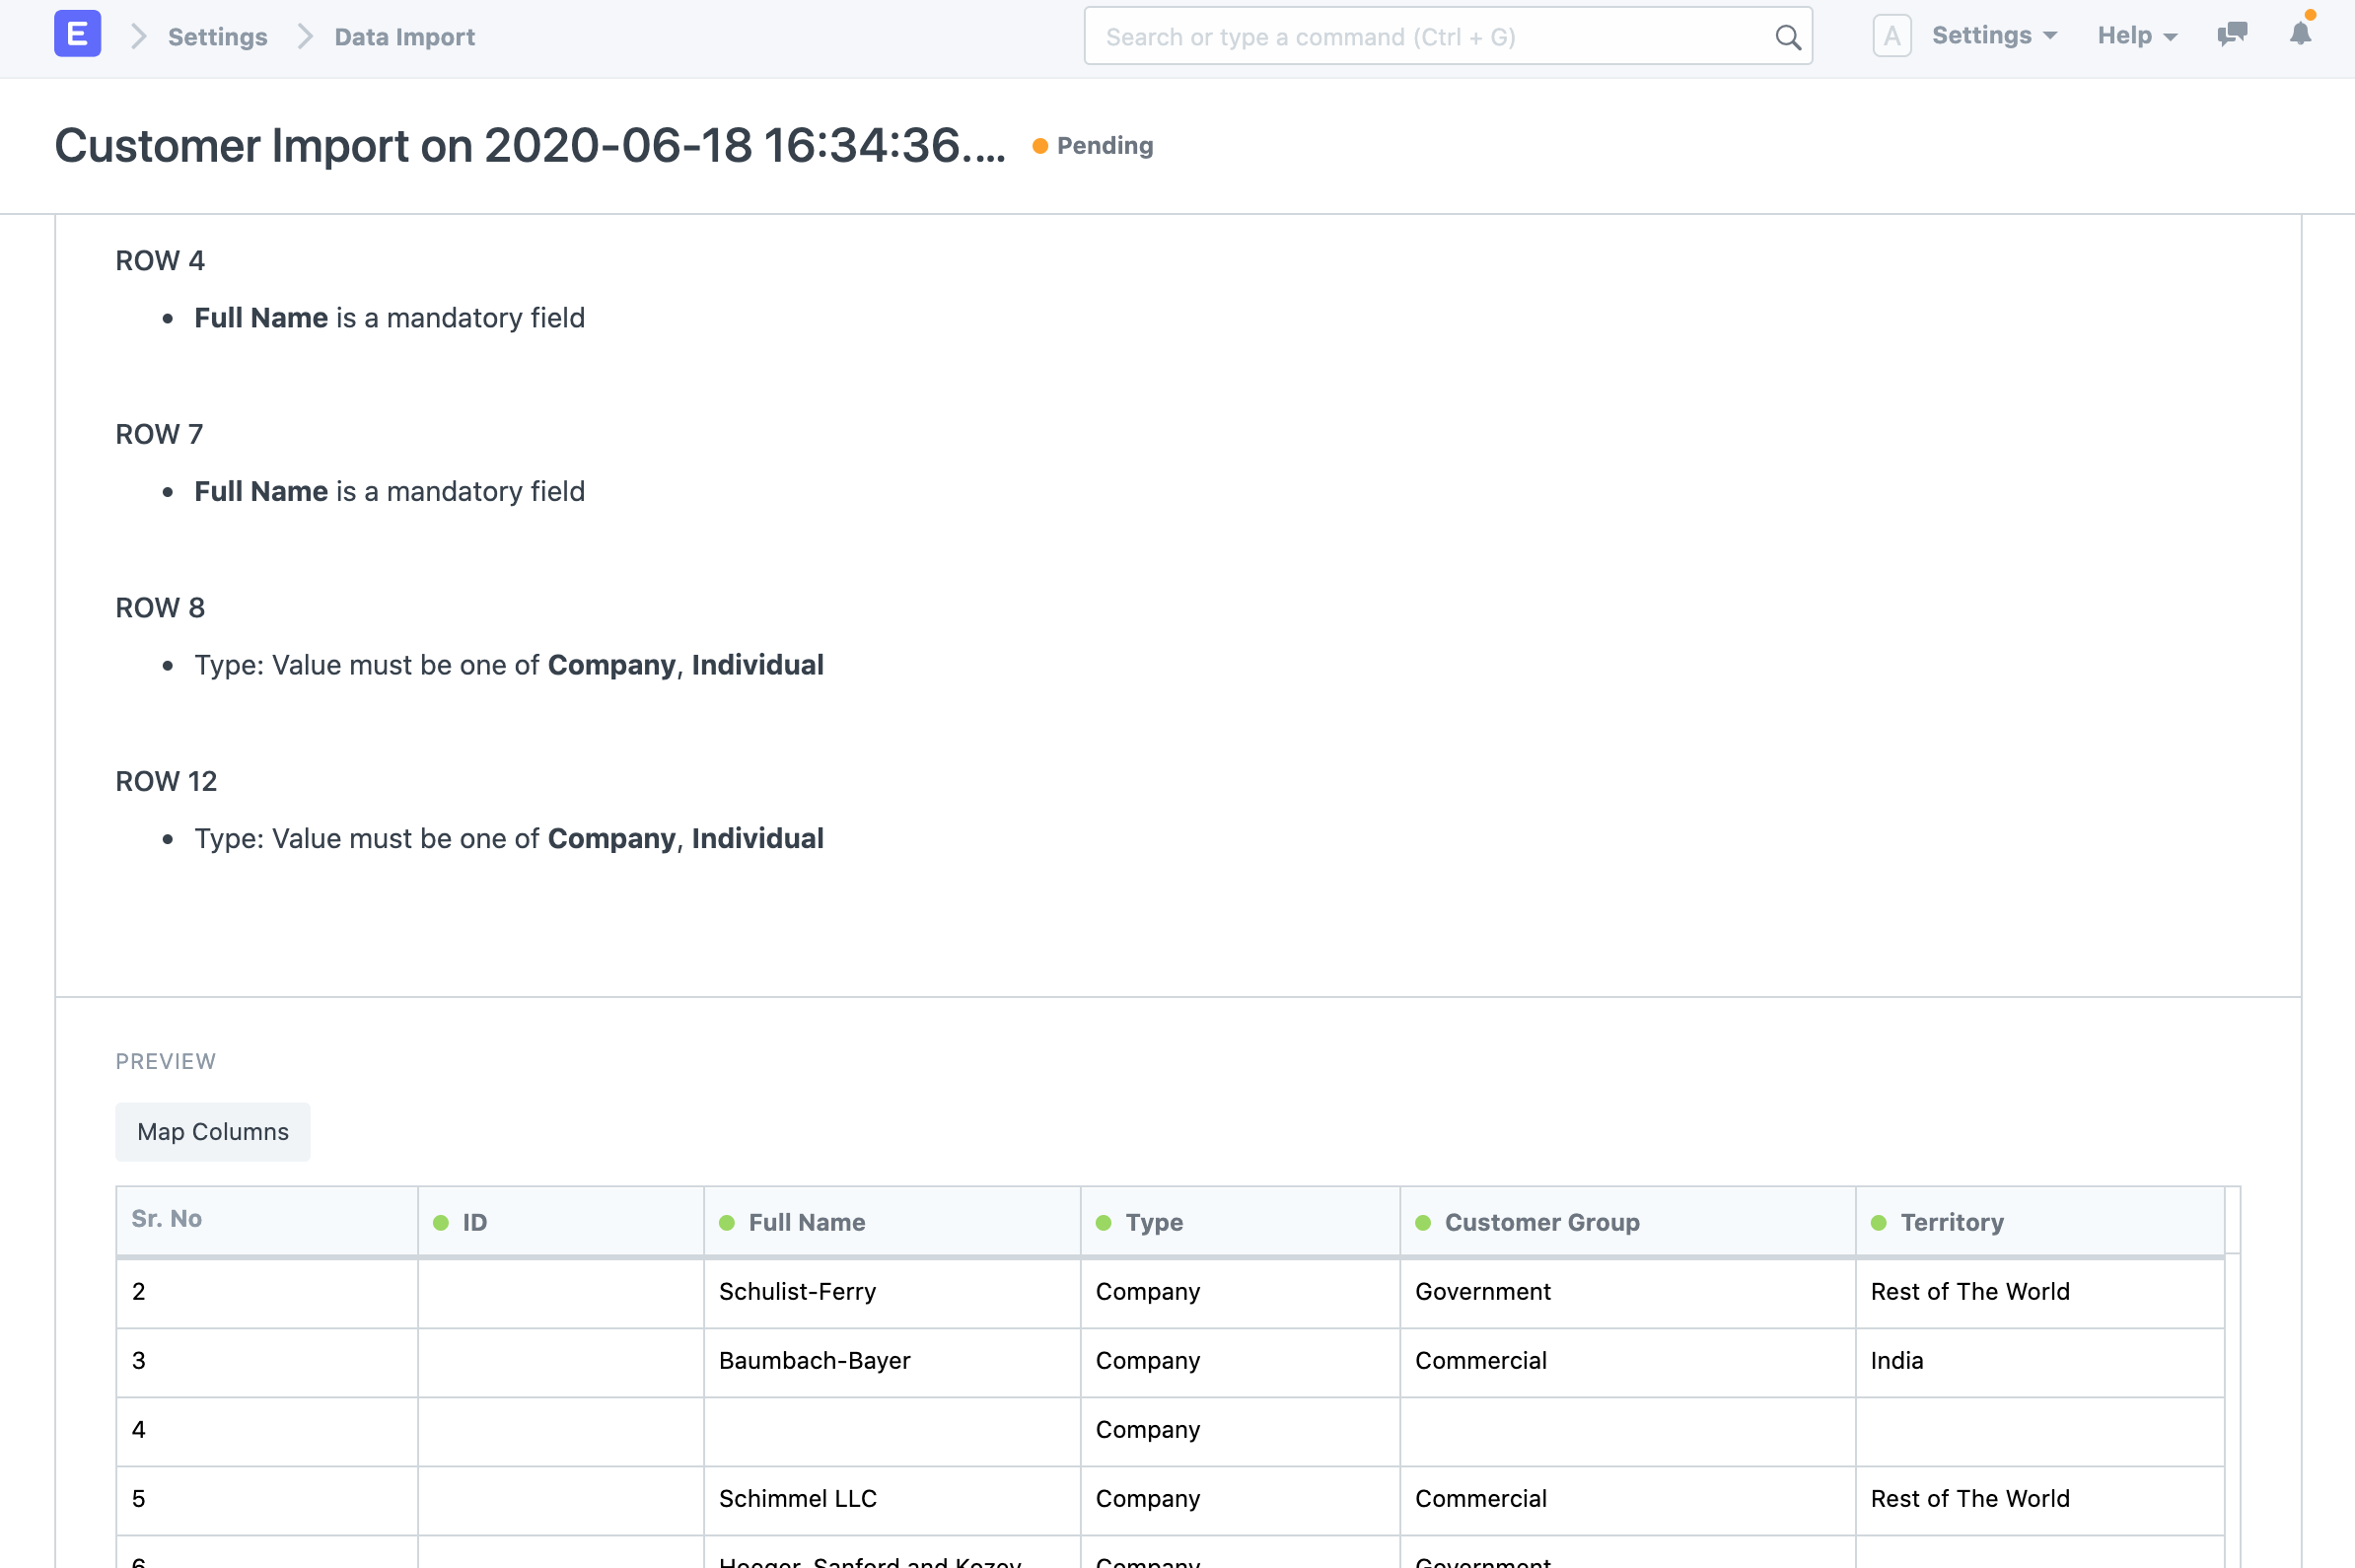 After addressing the warnings, click Start Import once more to continue with the data import. You may view a log of each record created following a successful data import in the Import Log section.
2. Updating Existing Records
Imagine you wish to change Customer data in your system in bulk. Downloading the template containing the data is the first step.
2.1 Download the Template
- Go to Customer List, click on Menu > Import. Click on New.
- Select Import Type as Update Existing Records
- Click on Save.
- Now, click on Download Template.
- While updating existing records, you must export the records from the system with the ID field and the fields that you want to update. You can choose All Records or Filtered Records depending on your case.
- Select the fields that you want to update for the Customer records.
- Click on Export.
2.2 Updating Data in the Template
This is how your downloaded template will appear:
 Change the values in your template now, then save the CSV or Excel file.
While exporting records for updating them, ensure that the ID column is exported and is untouched. The values in the ID column are used to identify the records in the system. You can update the values in other columns but not in the ID column. If you remove some child table row, the system will consider that the row is supposed to be deleted.
2.3 Importing the Template
Follow the directions in the section above on importing the template.
3. Importing Child Records
In Geer ERP, data is kept in tables that resemble spreadsheets with rows and columns of data. There are numerous fields on each form, including Customer, Company, and Sales Order. Additionally, it includes tables like the tax table and item table. The rows inside the child table (item table) are handled as the child table for data import, while the set of fields in the sales order are treated as the main table.
Geer ERP allows enables the creation of many child tables for each form. Where there are multiple values for any property, the child tables are used and are linked to the parent tables. For instance, a sales invoice may have many items and taxes, and each item may have multiple prices.
For instance, each child row will display on a separate row but will be linked to a single parent row when you export a document containing child tables. The parent columns' succeeding values will be left empty. When importing them via Data Import, you must make sure that this order is maintained.

4. Import Options
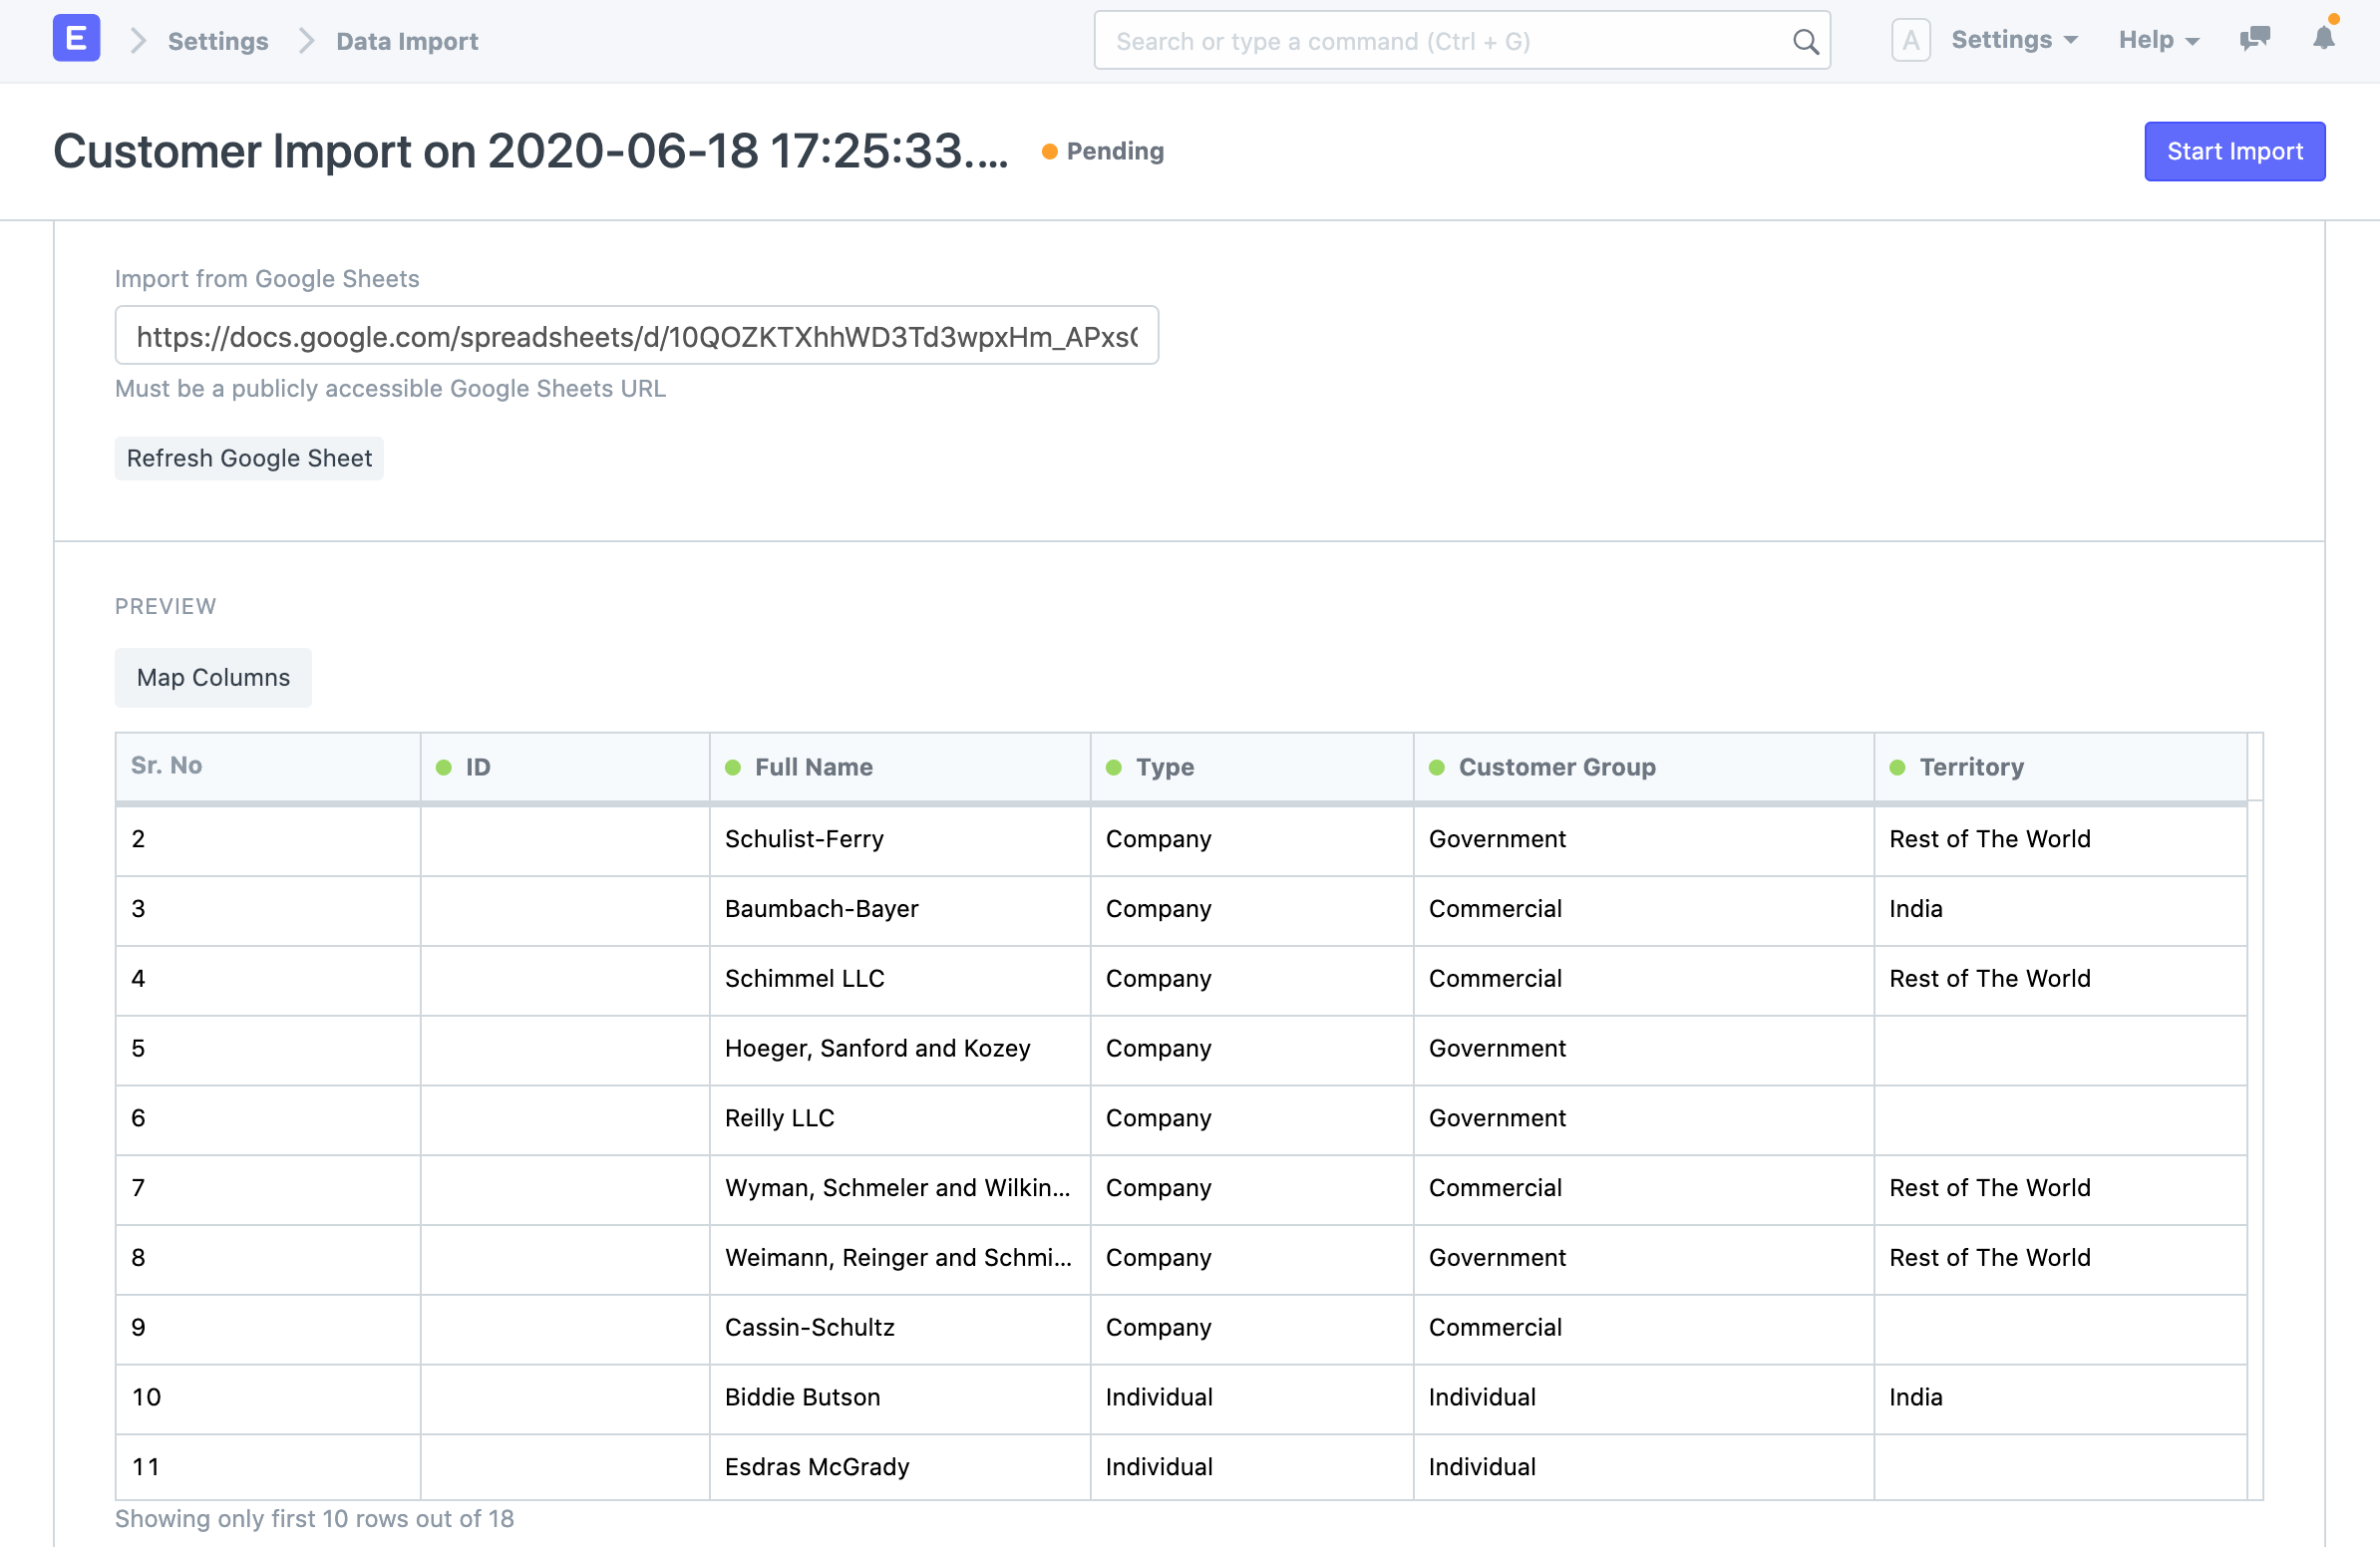
4.1 Import from Google Sheets
Google Sheets data can also be imported. Enter the data into Google Sheets after importing your template. A Google Sheet should be made public. By accessing the Google Sheets URL in a private browser tab, you may verify this.
4.2 Submit After Import
The two basic sorts of document types in Geer ERP are masters and transactions. Records like Customers and Tasks that can only be saved, not submitted, are considered masters. Sales orders and purchase invoices are examples of submittable documents that can be filed.
You can check the box Submit After Import when choosing a submittable document type for Import in order to submit the document after it has been imported.
4.3 Don't Send Emails
Let's imagine you set up a Notification in your system so that an email is delivered each time a Lead is formed. Now, a lot of emails will be sent if you import Leads in bulk, which may not be what you want. To stop sending emails, you can turn off this setting.
5. Additional Notes
5.1 Upload Limit
The volume of records that can be imported has no set upper limit. However, you should attempt to upload no more than a few thousand records at once. If 50,000 records are imported, the system may become noticeably slower for the people who are already utilizing it.
5.2 CSV Files
You can change any data in Geer ERP by uploading a CSV (Comma Separated Values) file. A CSV file can be created from any spreadsheet created with widely used spreadsheet programs like MS Excel or Open Office Spreadsheet.
Make sure to save your file encoded as UTF-8 if you're using non-English characters in Microsoft Excel.
It is unclear how to save as UTF-8 in earlier versions of Excel. In order to save your file as "UTF-8," first save it as CSV, then open it in Notepad. (Or, improve Excel!)
Data Export
Data Export lets you export data from DocTypes to a CSV or an Excel format.
You can use the same file to import data using Data Import after exporting data.
Go to: to access Data Export.
Home > Settings > Data Export
1. How to Use Data Export
- Go to the Data Export DocType.
- Select the DocType whose data you want to export.
- Select the file format whether CSV or Excel.
- Select the fields to export, the red ones are mandatory.
- You can also add filters to select only specific data, for example, Grand Total >= 1,000 for Sales Orders.
- Click on Export to download the file.
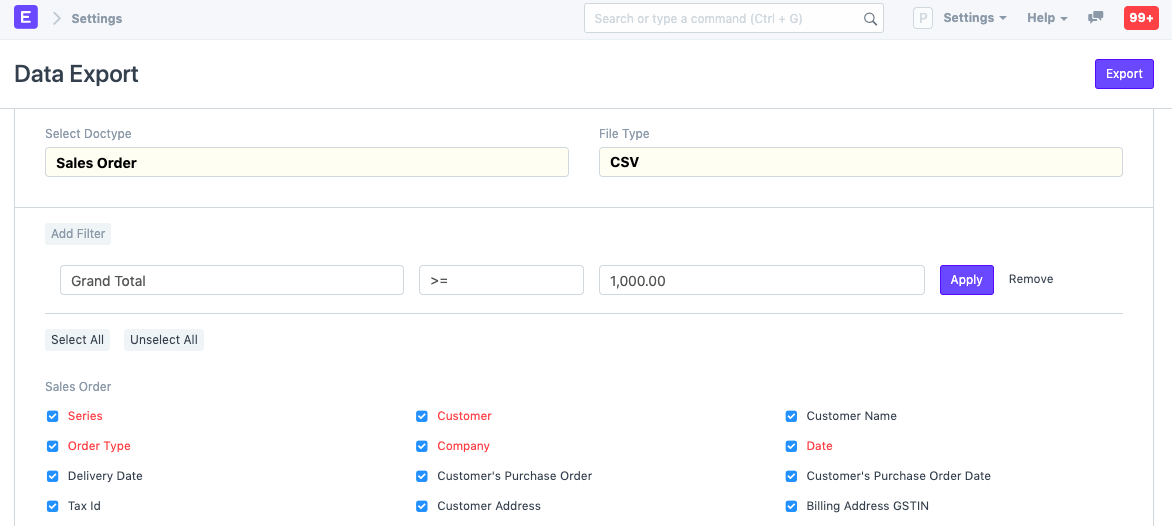
Chart Of Accounts Importer
Introduced in Version 12
The Chart of Accounts for a new firm in Geer ERP is automatically built using a pre-set structure. However, you can import your own Chart of Accounts using the Chart of Accounts Importer if you already have one.
You can design your own Chart of Accounts and import it into the system in accordance with your needs.
The current Chart Of Accounts for that company will be replaced. Make sure the business you choose has no previous transactions; otherwise, a validation error will be returned.
Go here to access:
Home > Getting Started > Chart of Accounts Importer
1. How to import Chart Of Accounts
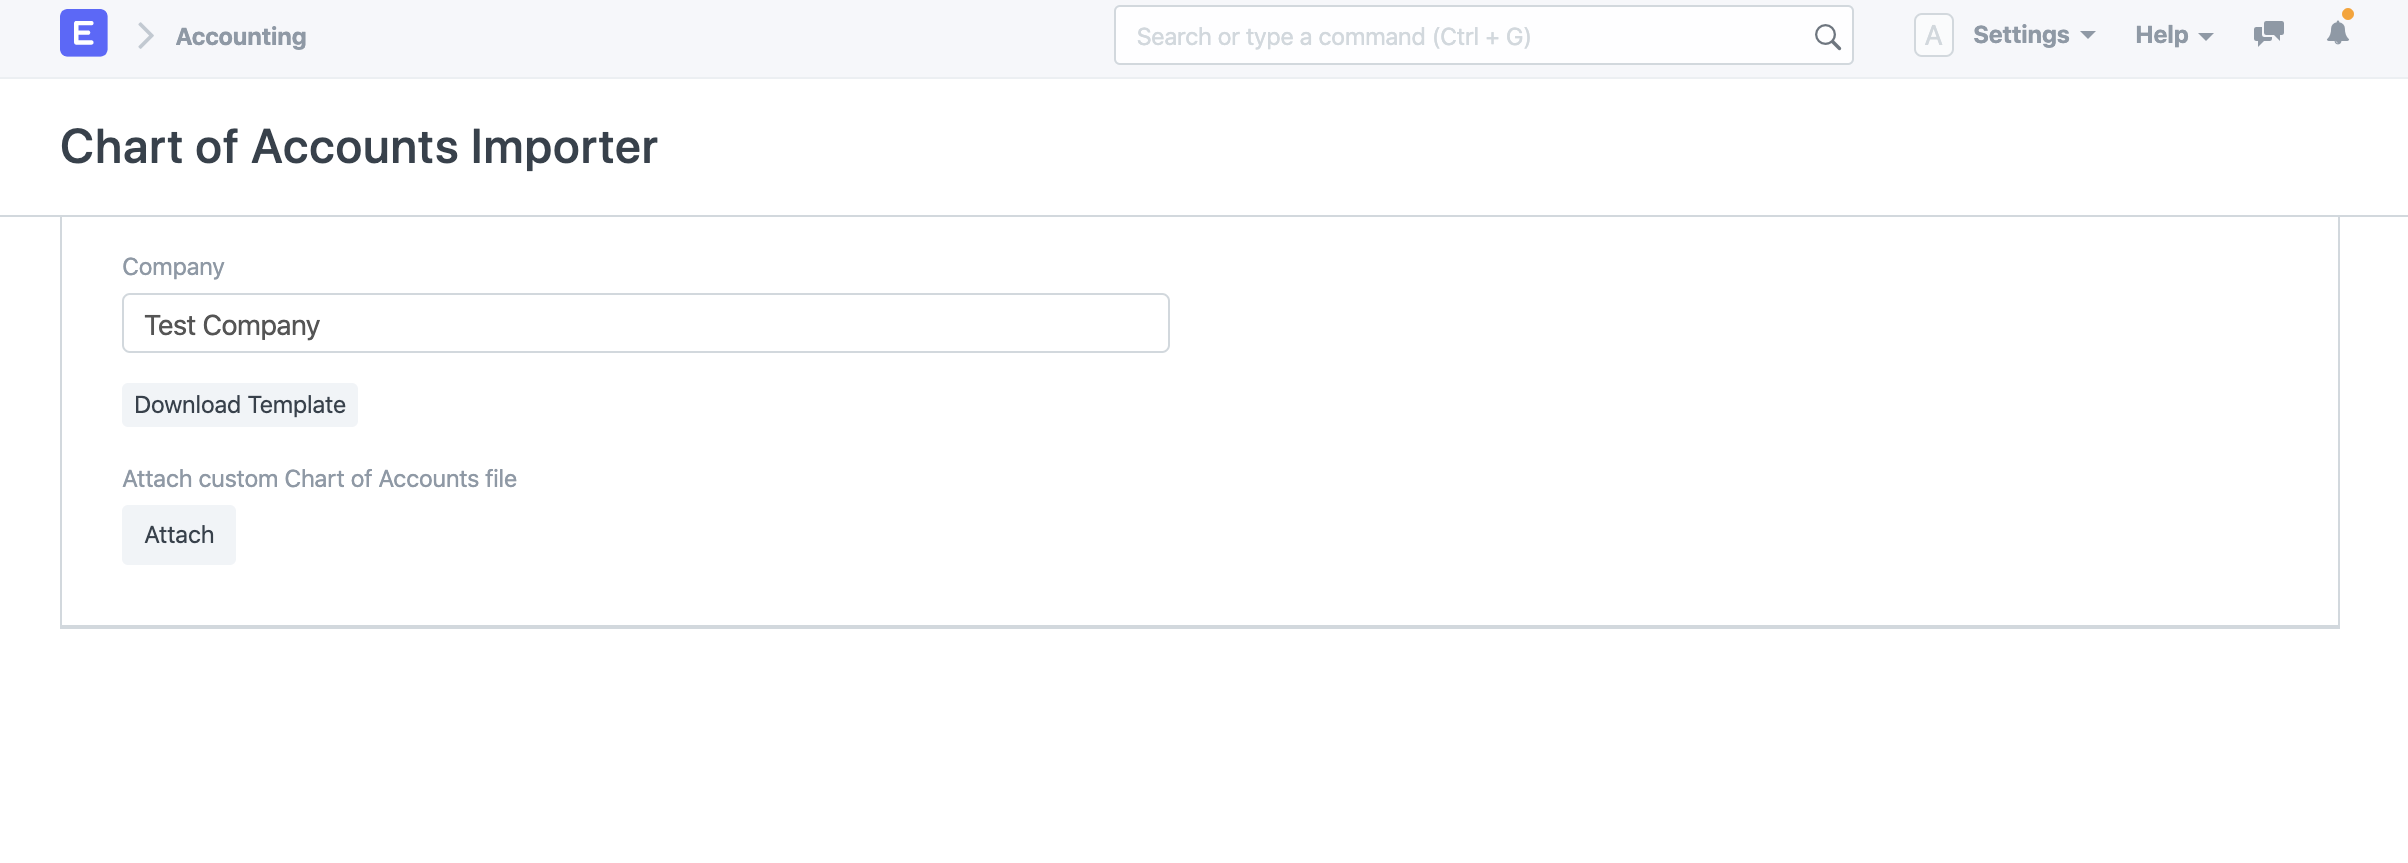
Select the Company for which you want to import the Chart of Accounts.
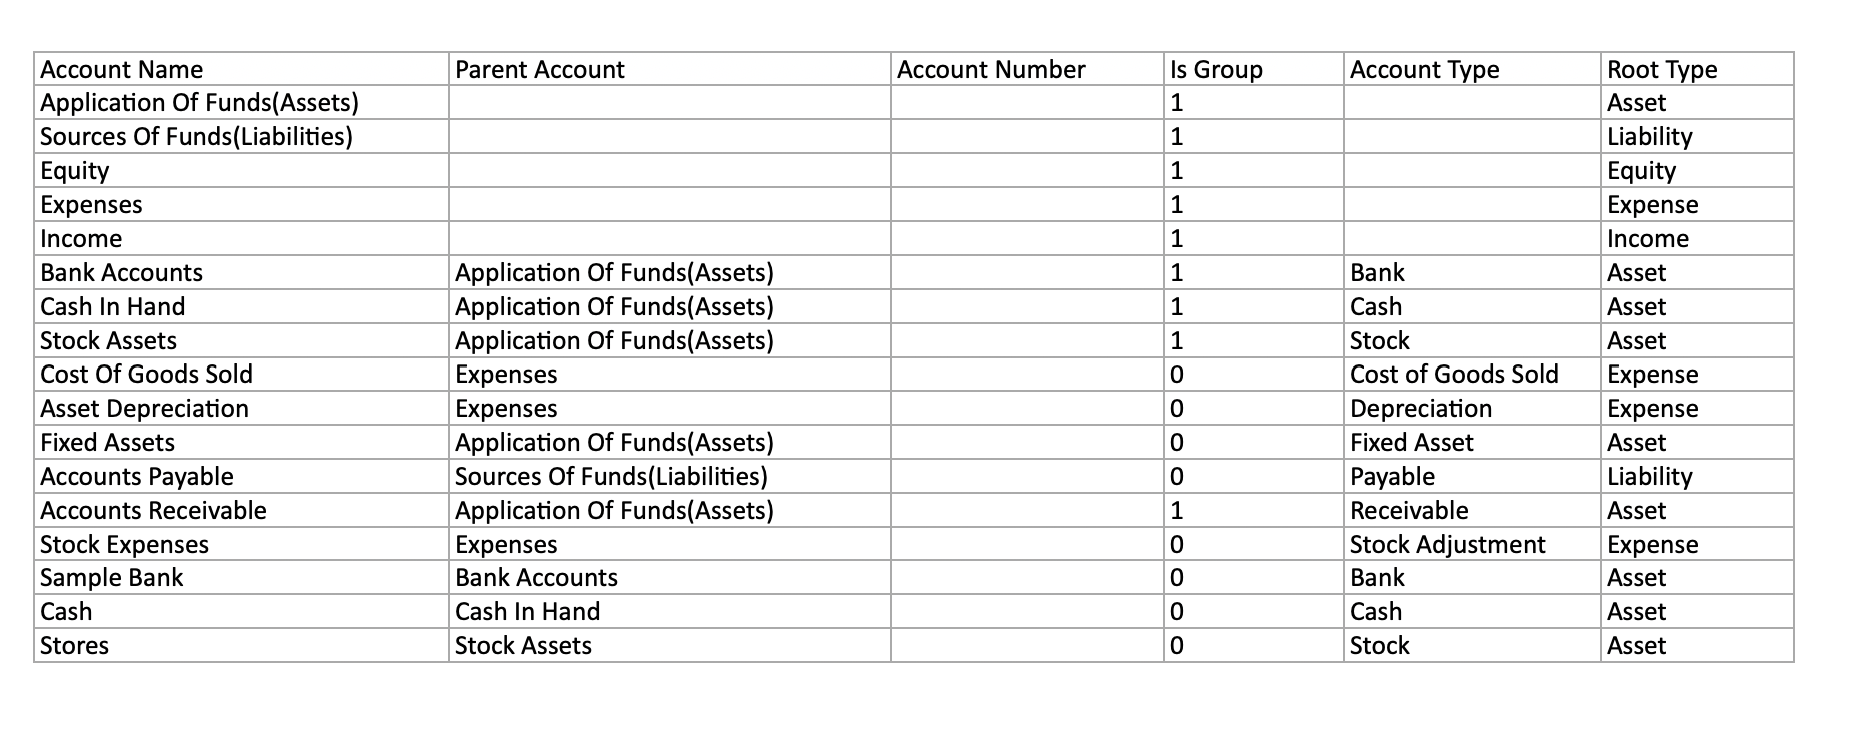
Click on "Download Template" button to download the template. Select file type in which you want to download the template. Select the template type and click on "Download". "Sample Template" contains pre-filled sample data so that you get an idea of how to fill the template. You can edit the data in "Sample Template" itself or download "Blank Template" for a fresh template.

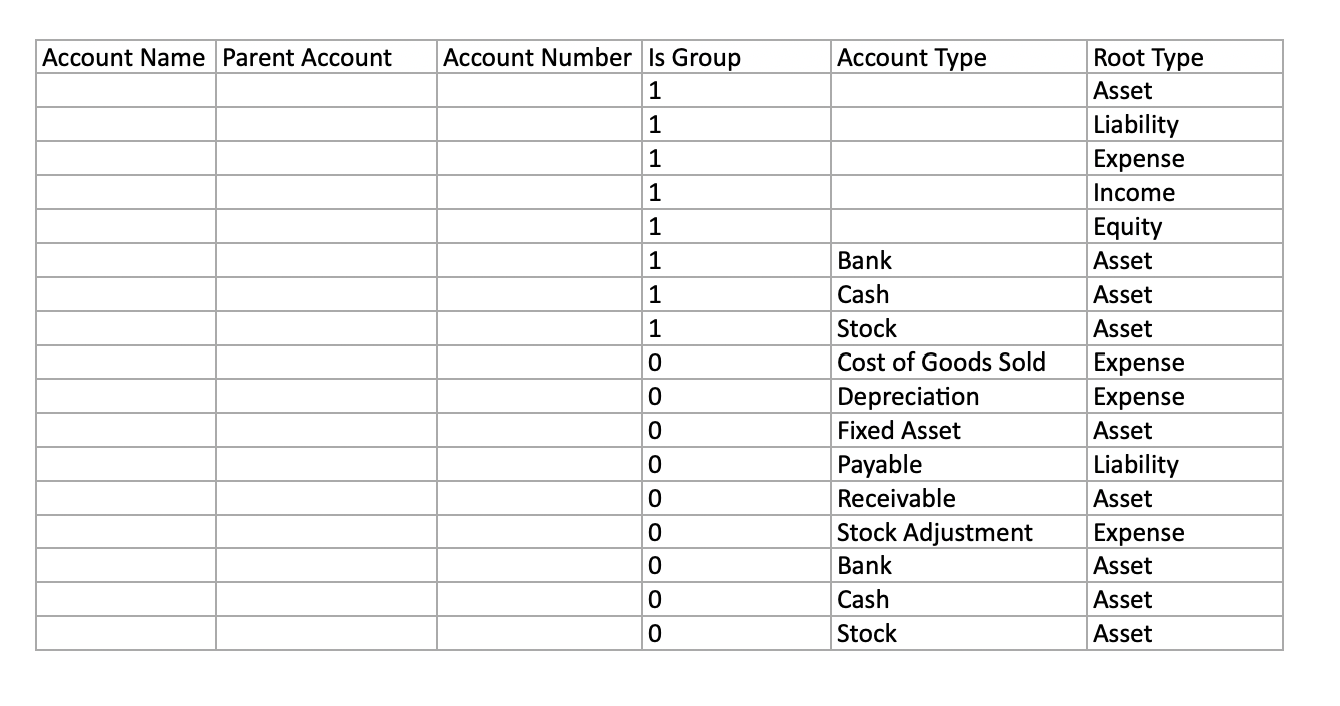
- Once you download the template, fill in the details in the template as shown in the sample template below. Please make sure to make accounts for account types "Cost of Goods Sold", "Depreciation", "Fixed Asset", "Payable", "Receivable", "Stock Adjustment". Root types for these accounts must be one of Asset, Liability, Income, Expense, and Equity.
To know more about "Account Types" and "Root Types"
 4. Click on "Attach" to upload the template.
 5. Once you upload the template you'll be able to see the preview of the Chart of Accounts in the Chart Preview section.
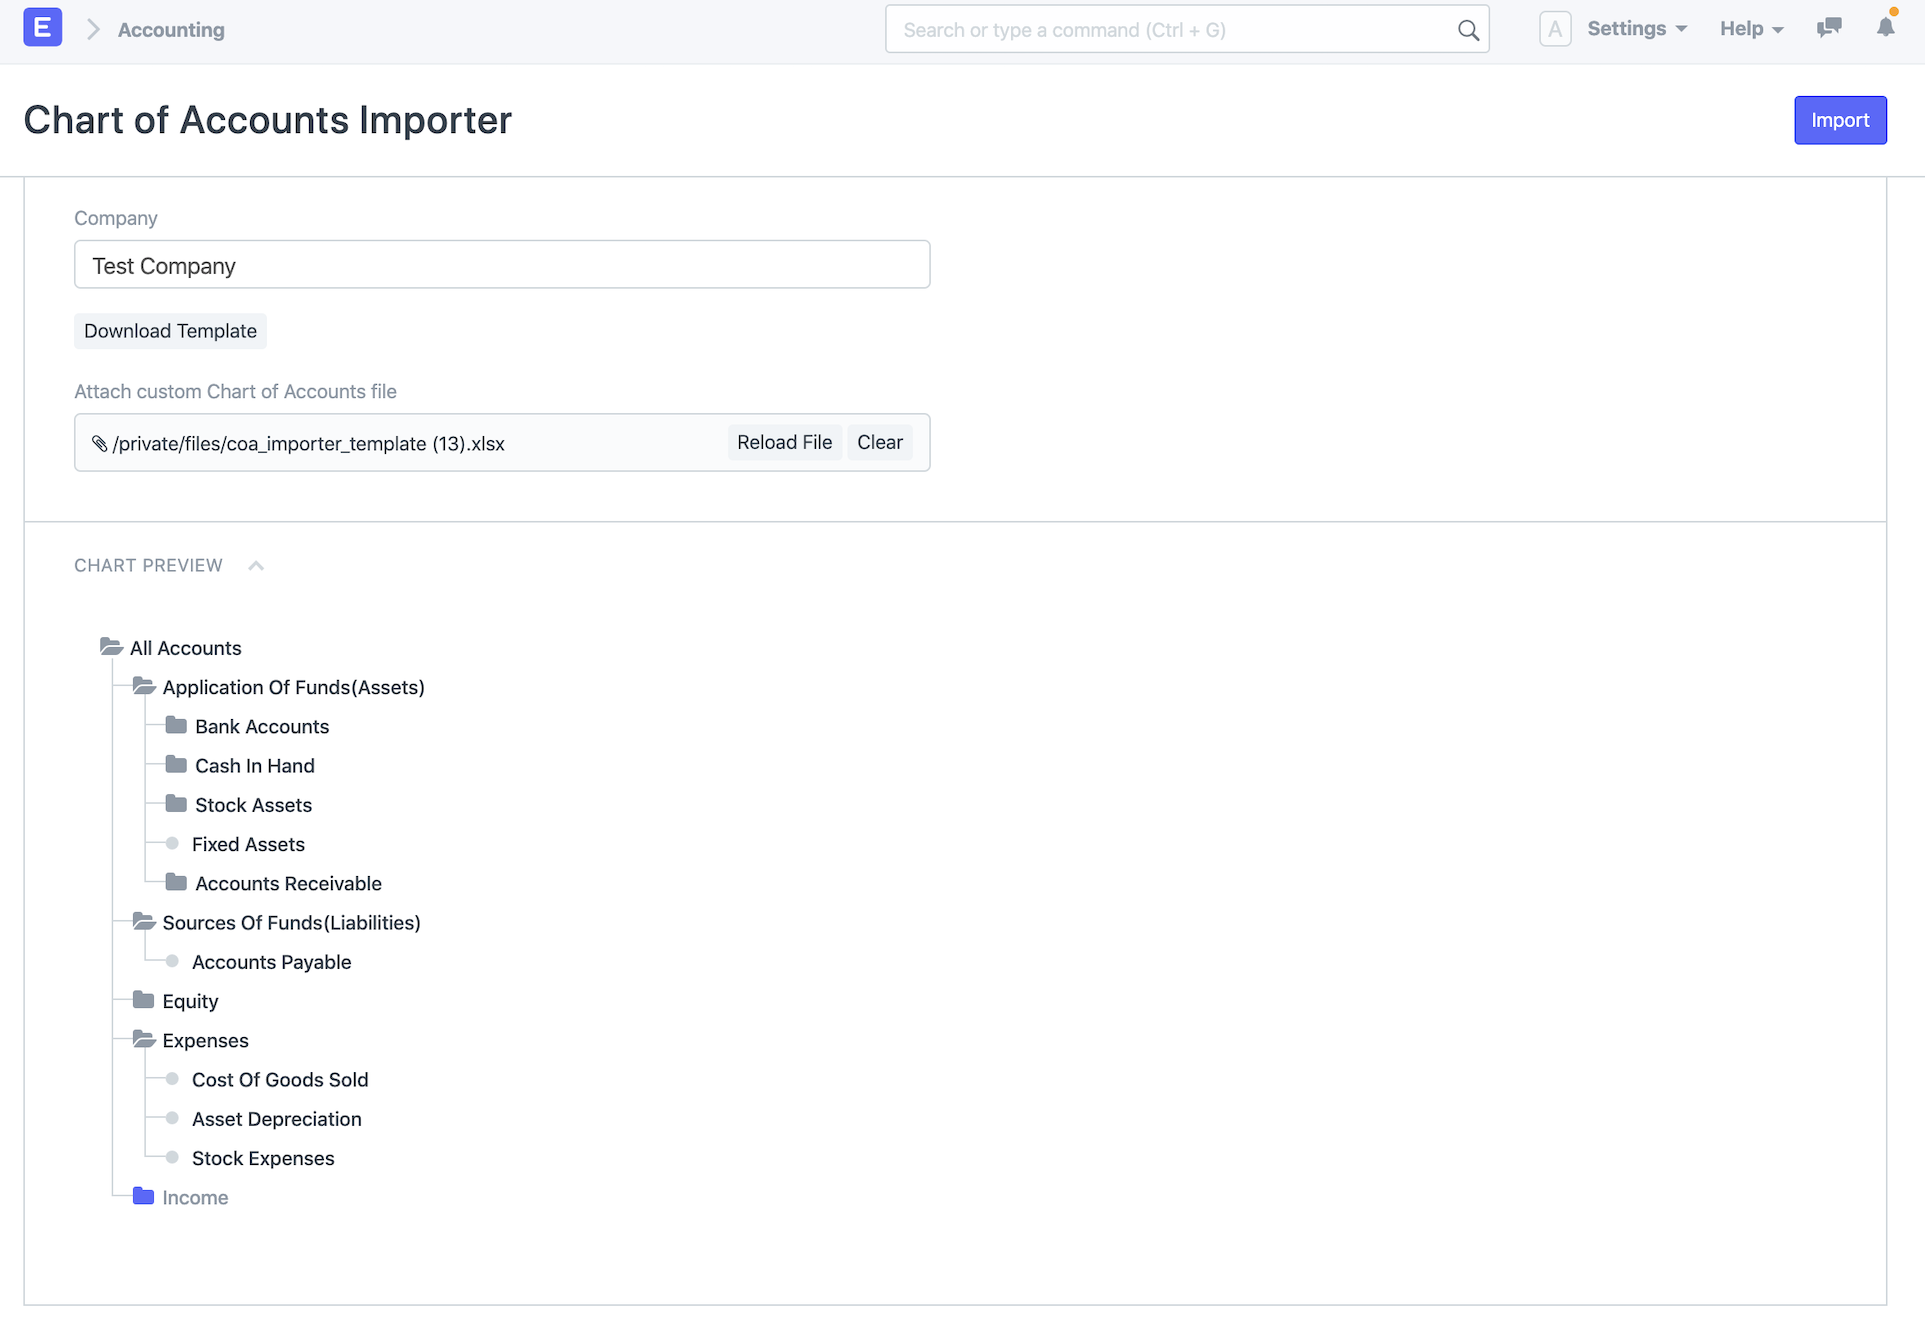 6. If everything seems correct in the preview, click on "Import" in the top right corner and the accounts will be created.
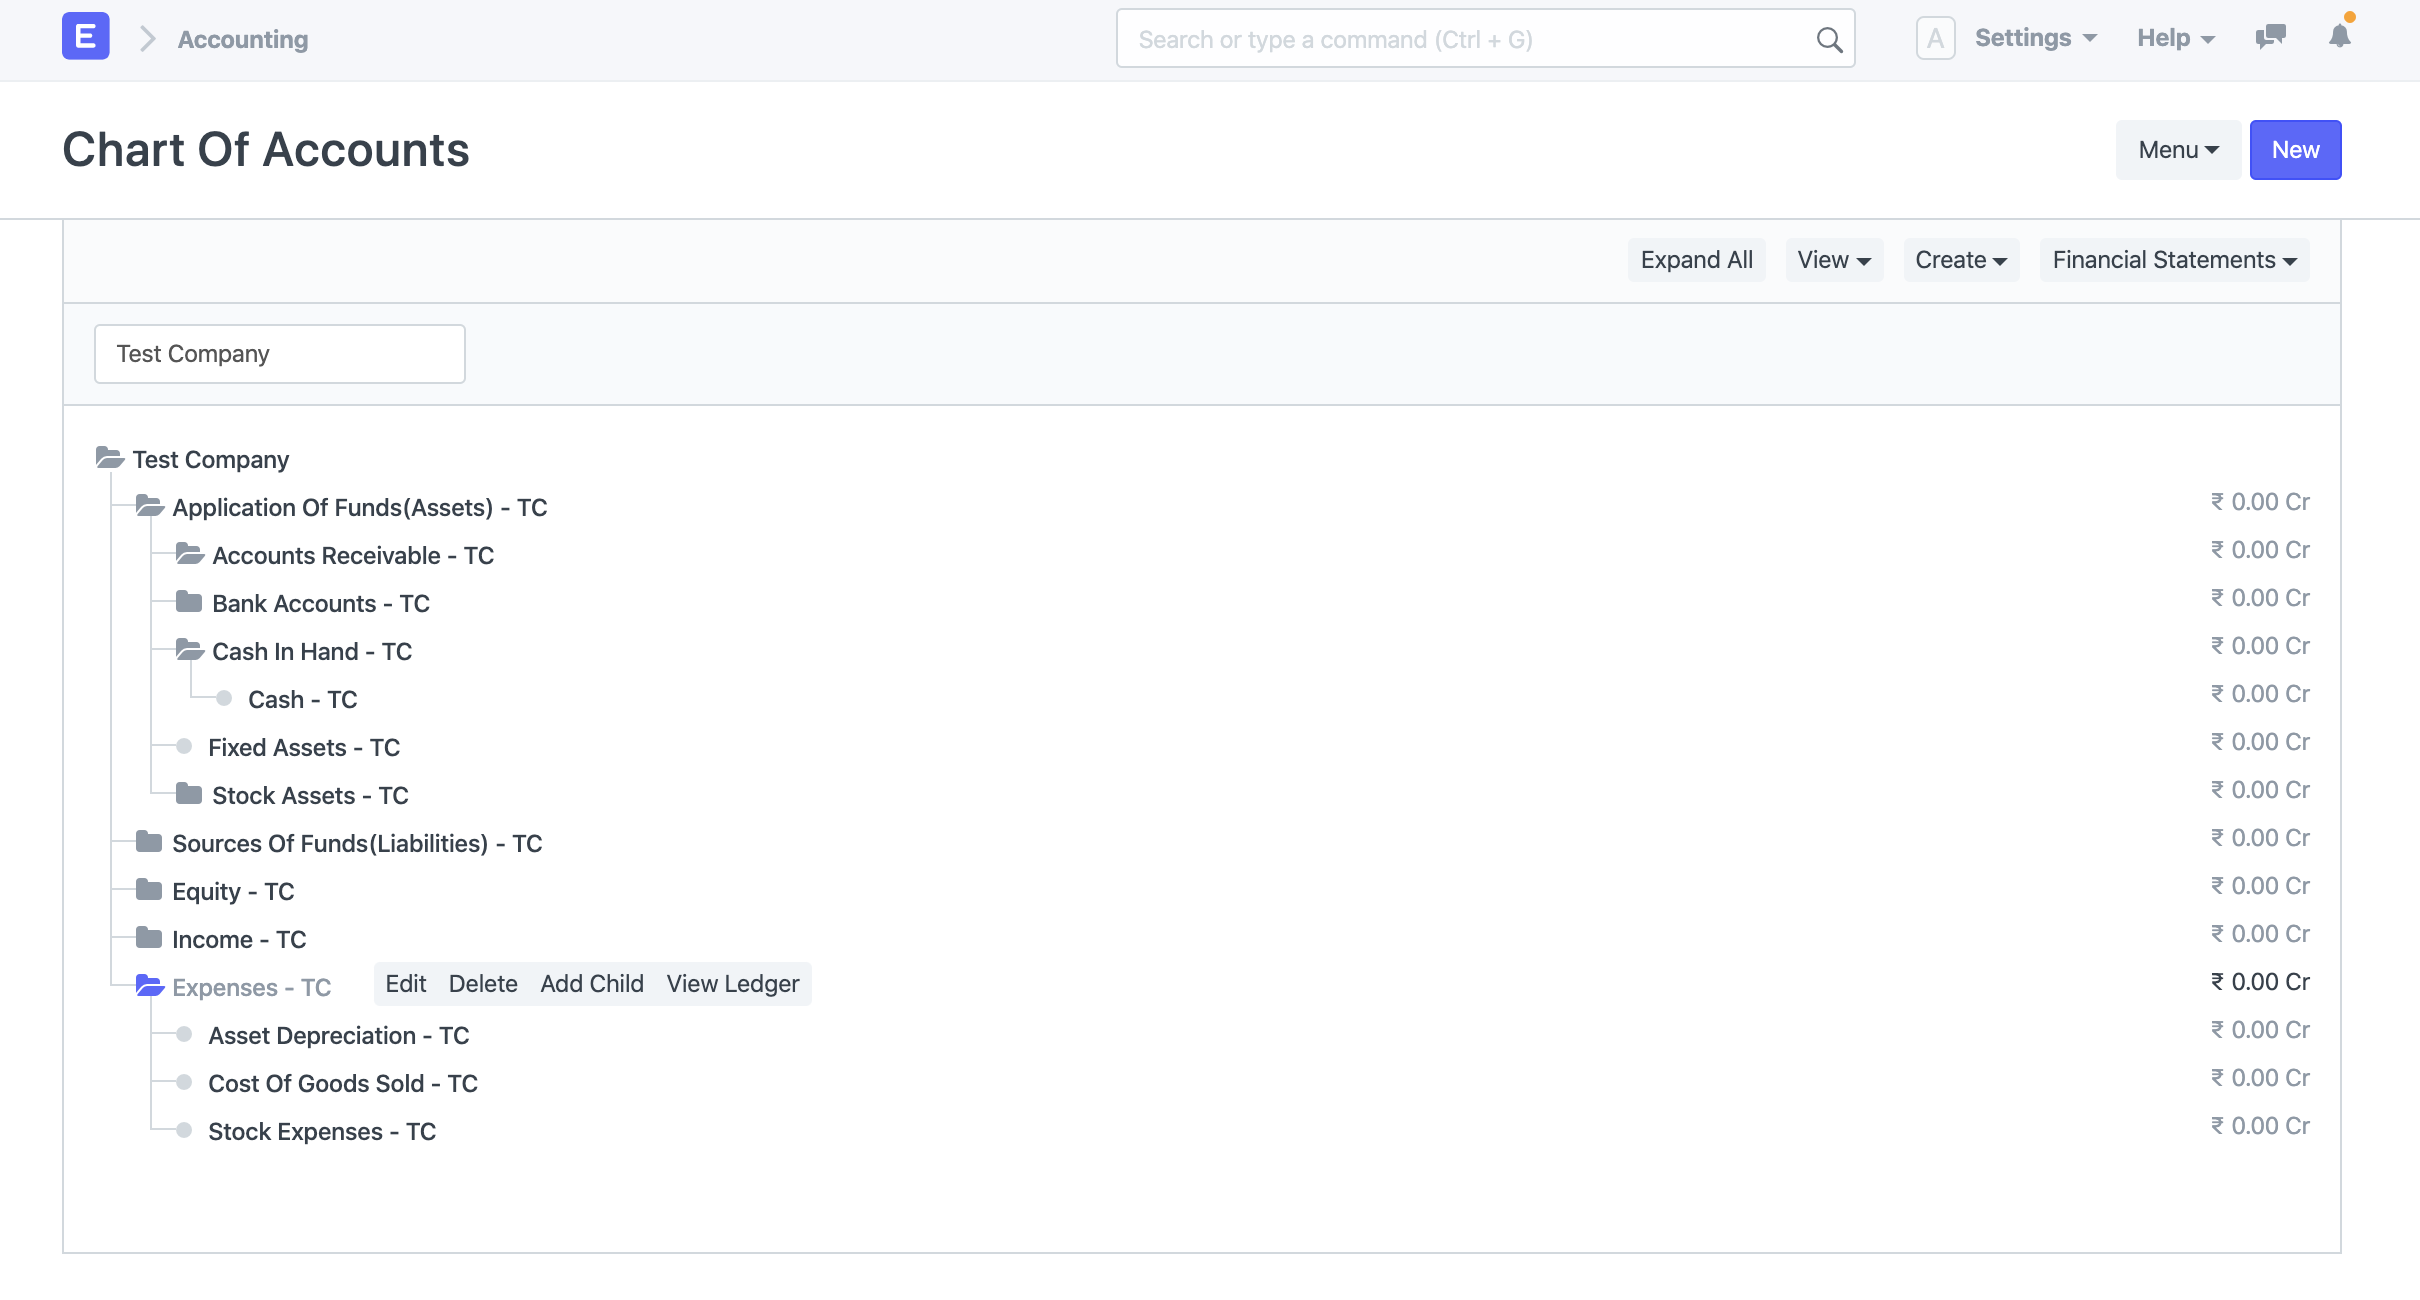
.png) 7. To verify the created accounts you can go to Chart of Accounts and see the newly created accounts for that company.
7. To verify the created accounts you can go to Chart of Accounts and see the newly created accounts for that company.
Downloading Backups
You can manually download database backup in Geer ERP. Go to: to see the most recent database backup.
Home > Settings > Download Backups
Every eight hours, a backup is updated and made accessible for download. To download the backup at a specific time, click the link.
 Three of the most recent backups will by default be made accessible for download. Click "Set Number of Backups" to modify this. By doing this, you can change the number of backups that are accessible for download at once under the System Settings.

Downloading Files Backup
When you select Download Files Backup, a link to the private and public file backups will be sent to you through email. To make this function, email configuration is required.

Automating Backups to Cloud Storage
Additionally, you can program your backups to automatically upload to cloud storage services. Geer ERP currently supports:
- Amazon S3
- Dropbox
- Google Drive
Adding Users
The System Manager has the ability to add users. Go to: to add users.
Home > Users and Permissions > User
Users can be divided into two categories:
Customers, suppliers, students, and other website users with access to merely the portal and none of the modules. Users of the system are anyone having access to the company's modules, corporate data, etc. who uses Geer ERP.
Learn more about the distinction between a website user and a system.
A lot of information can be put under User. The information entered for web visitors is minimal for usability's sake: Name and email address.
The distinctive key (ID) used to identify Users is their email addresses.
1. How to Create a New User
- Go to the User list, click on New.
- Add an Email address and name of the user.
- Save.
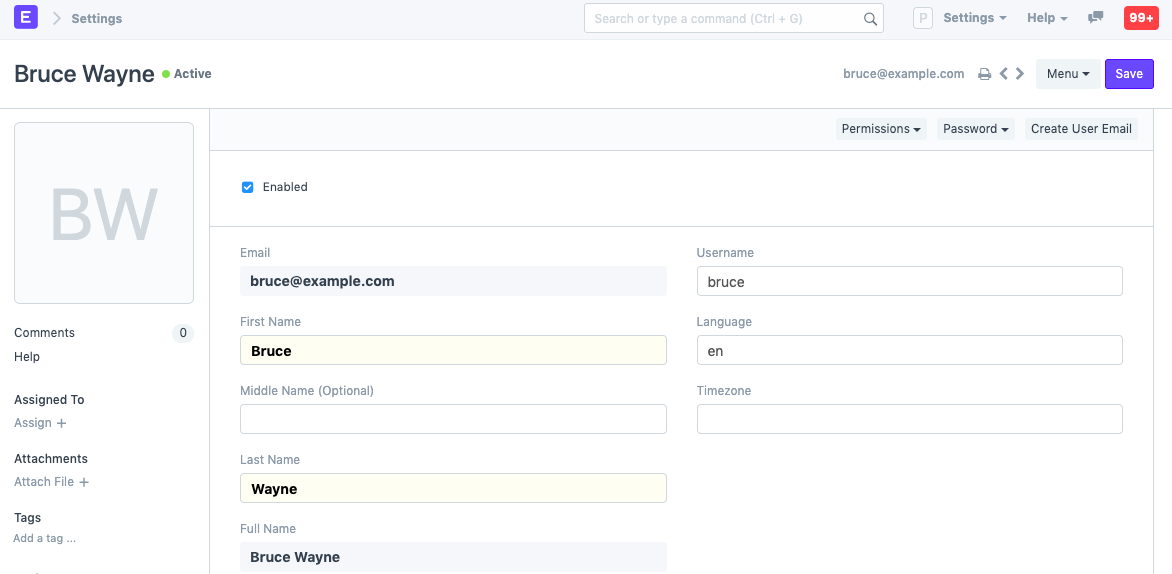 It is also possible to adjust specifics like Username and Language.
2. Features
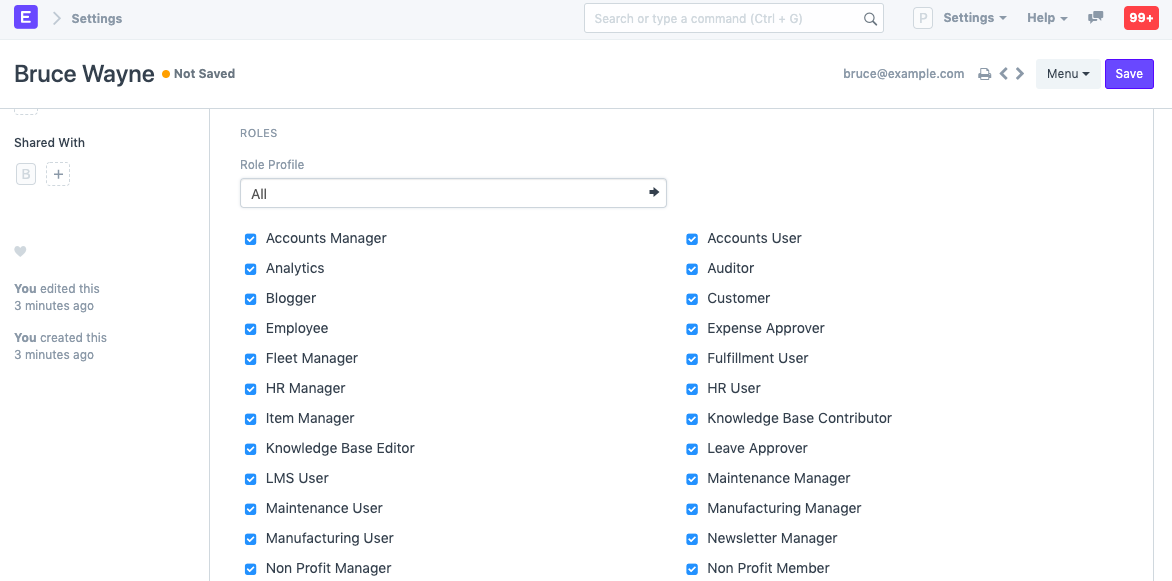
2.1 Setting Roles
You will see a list of roles with ticks next to them after saving. Simply check the responsibilities that you want the user to have and save the file. For additional information about roles and their pre-defined permissions, visit here. Role profiles can be configured to act as a template for selecting several roles at once.
2.2 More Information
This area allows the employer to set additional personnel information.
- Gender
- Phone
- Mobile No
- Birth Date
- Location
- Interests
- Bio
- Banner Image The "Mute Sounds" checkbox will silence any sounds that play when you interact with documents. To make changes, the user might need to select Settings > Reload.
2.3 Change Password
- Set New Password: As a System Manager, you can set a new password for the user if it needs to be changed.
- Send Password Update Notification: Send an email notification to the user that their password has been changed.
- Log out from all devices while changing Password: When changing the user's password, this logs out the user from PC and any mobile device they may have logged into.
2.4 Document Follow
You can use this option to follow different system documents and receive email notifications when they are updated. Find out more here.
2.5 Email Settings
- Send Notifications for Email threads: The user will get notifications for Email conversations that take place in document types like Opportunities.
- Send Me A Copy of Outgoing Emails: Sends the user a copy of the emails they send. This is useful for keeping track if the email got sent.
- Allowed In Mentions: Allow this user's name to appear in thread conversations so that they can be mentioned using '@'.
- Email Signature: Adding an email signature here will set it as default for all outgoing emails for the user. This is different from a footer which is set from the Company master.
2.6 Email Inbox
From this section, add the user to your company's various mailing lists. Choose the mailing list to which you want to add this person in a new row. Mailing lists, for instance, can be for jobs, assistance, sales, etc. Click here to learn more about email inbox.
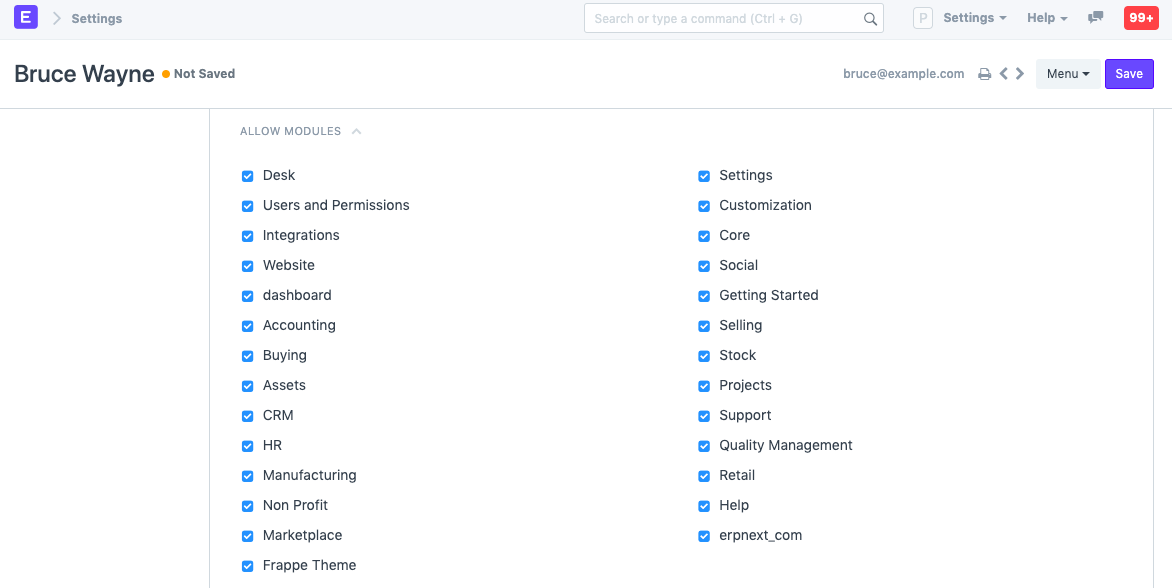
2.7 Allow Module Access
ll modules to which they have role-based access will be available to users. Uncheck the modules from this list if you wish to limit this user's access to specific modules.
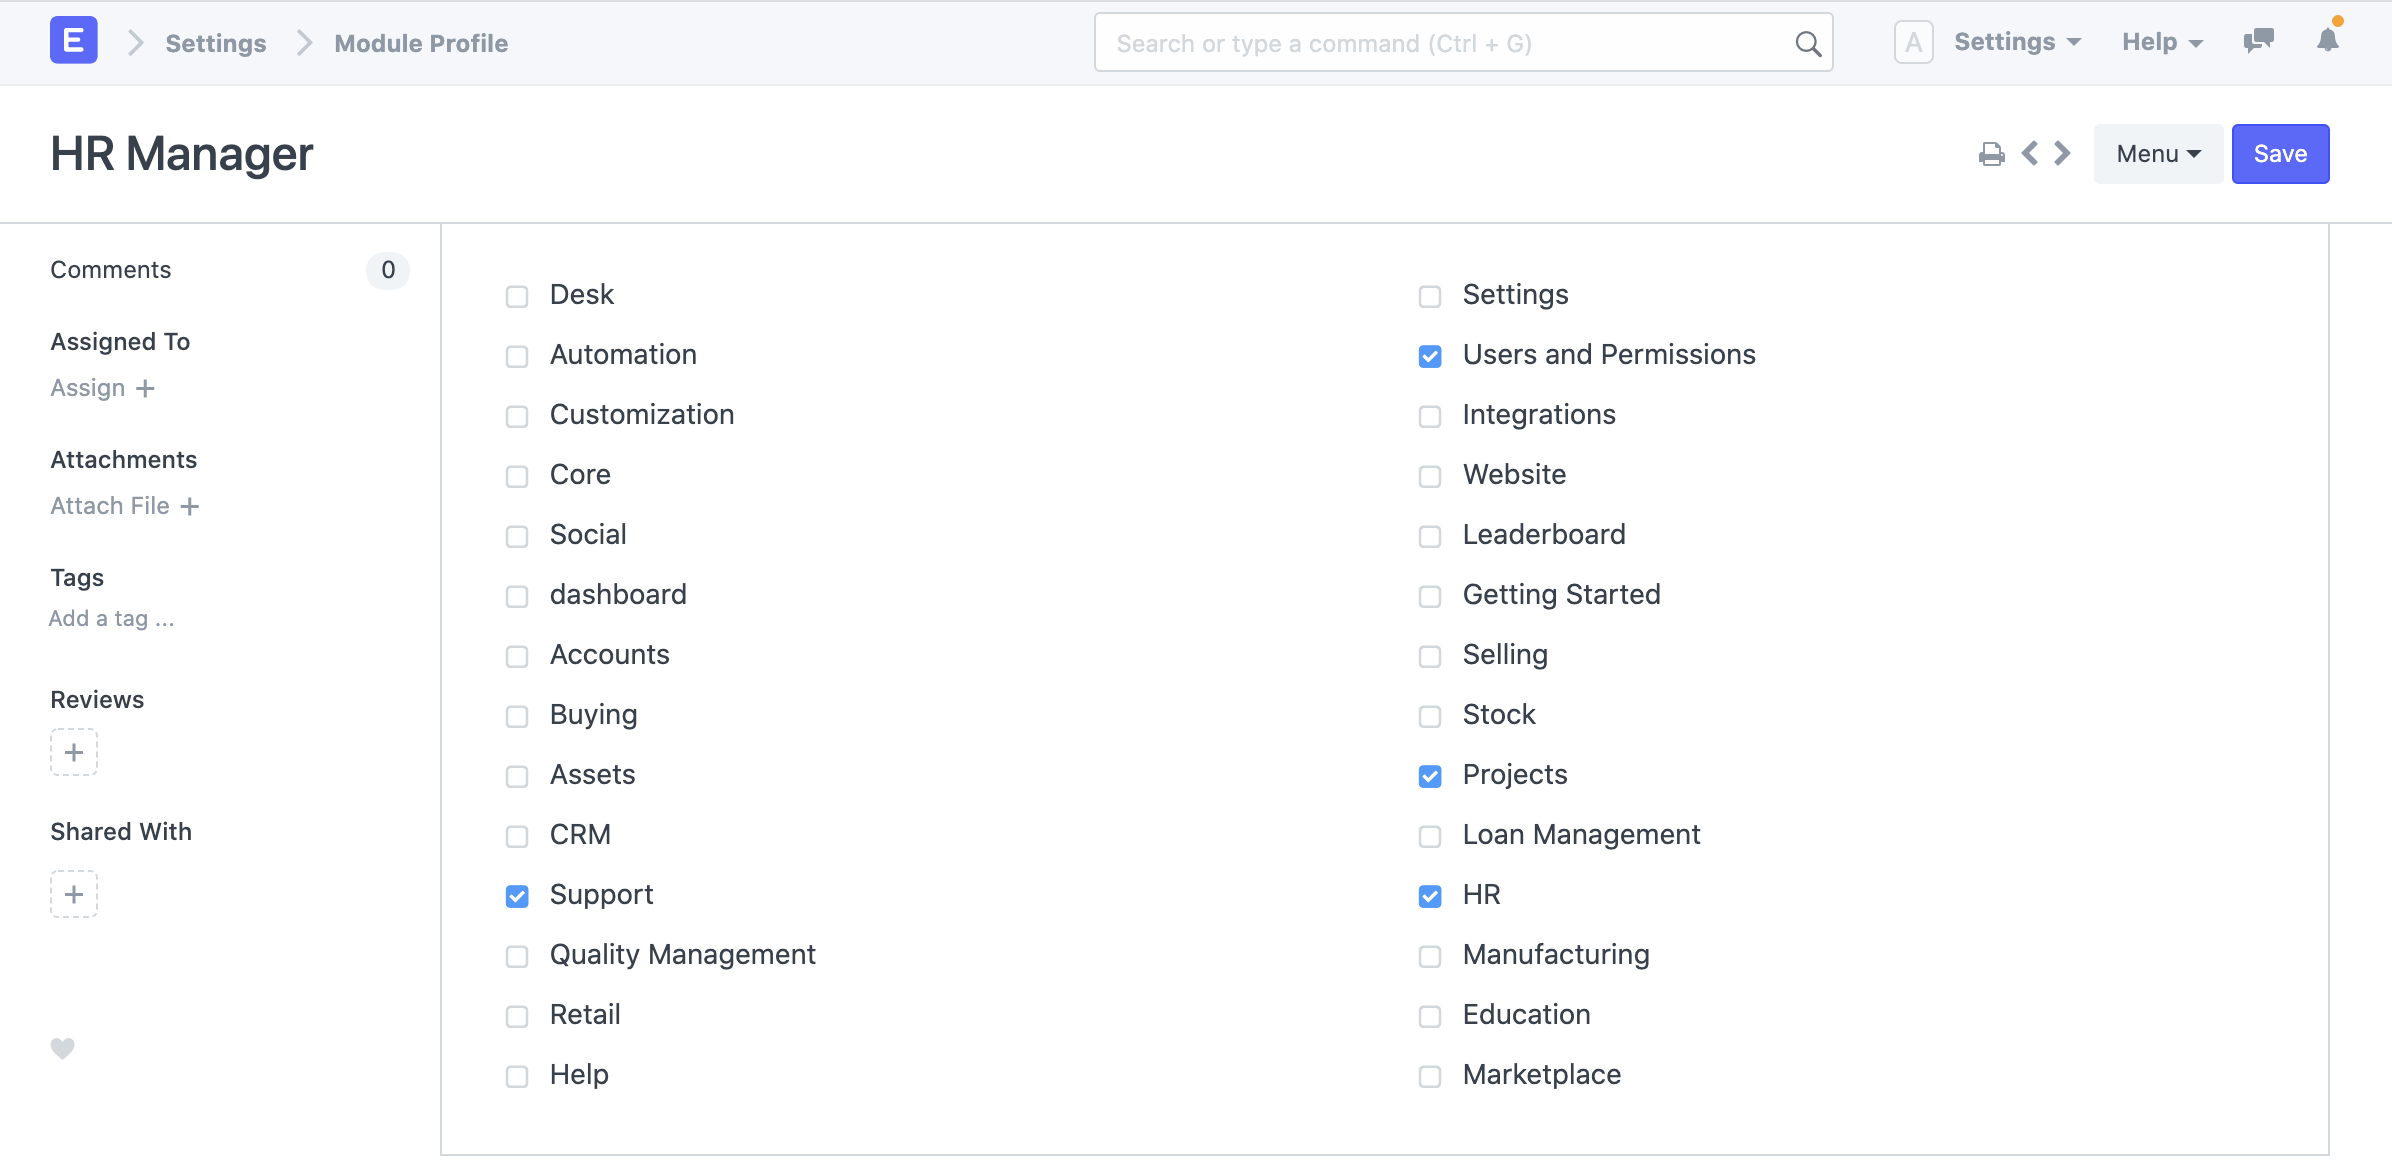
2.7.1 Module Profiles
Role Profiles serve as a pattern for organizing and choosing access to various modules. The user can then be given this Role Profile. HR users, for instance, will have access to many modules, including payroll and HR. When adding several users, role profiles are helpful in granting access to several modules at once.
2.8 Security Settings
- Simultaneous Sessions: Simultaneous login sessions the user is allowed. You can use the same set of credentials for multiple users by allowing more sessions. This can be restricted from System Settings globally. For cloud account, the total number of simultaneous sessions cannot exceed the total number of subscribed users.
- User Type: If the user has any role checked other than Customer, Supplier, Patient, or Student they automatically become a System User. This field is read-only.
- Login After, Login Before: If you wish to give the user access to the system only between office hours, or during weekends, specify it here. For example, if office hours are from 10 am to 6 pm, set the Login After, Login Before hours as 10:00 and 18:00.
- Restrict IP: Restrict user login to the IPs specified here. This can be used so that the user can log in only from office computers. Multiple IPs can be added separated by commas. Additionally, this area displays information on the user's last login, last IP address, and last active period.
2.9 Third Party Authentication
Users will be able to log in using Facebook, Google, or GitHub as a result. Create a developer account with Facebook, Google, GitHub, etc. to access this functionality. To get started, create an app on their console, give it a name, and specify its originating and callback URLs. Then, copy the client ID and client secret information.
Visit this page to learn more
2.10 API Access
Using the Generate Keys button in this area, you can create API Secret keys. This can be used to access the information about your account from another program, like an offline point-of-sale system.
2.11 After saving
These buttons can be viewed on the User master's dashboard after a user has been saved.

Permissions
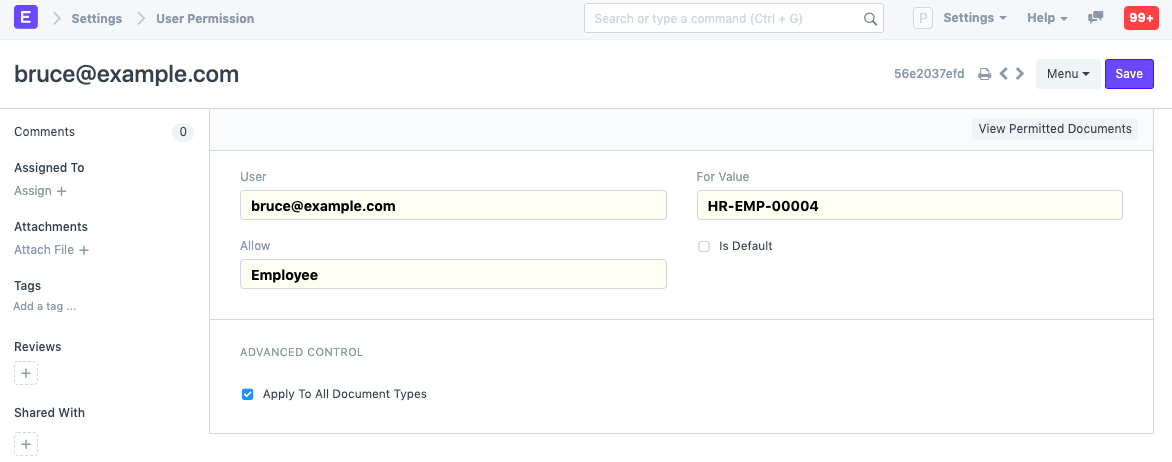
- Set User Permissions: Will take you to the User Permissions page of Bruce from where you can restrict Bruce's access to documents.
- View Permitted Documents: Will take you to the 'Permitted Documents For User' report for this user. Here you can see which documents does Bruce have access to. For example, on selected Sales Order, the list of Sales Orders Bruce has access to will be displayed.
Password
- Reset Password: An email with instructions to reset the user's password will be sent to the user's Email Account.
- Reset OTP Secret: Reset OTP Secret for logging in via Two Factor Authentication. Based on the email address given in the User master, Create User Email allows you to create an email account for the user.
3. Login Methods
If the "Allow Login with Mobile No" checkbox is selected in System Settings' Security subsection, a mobile number can also be used to log in. A mobile number will be distinct, but it won't be used as a user ID.
Register with Email:
Login using your email or phone:
Save the user after adding these details.
Users And Permissions
Geer ERP allows you to establish many users and give each of them a unique role.
A user is given a role, which is a set of permissions, so they can access the documents they require. For instance, a salesperson needs access to sales transactions but not to approve leave requests.
Some users can only access the Geer ERP portion visible to the public (i.e. a portal view). These users are referred to as "Website Users." According to the roles defined, "System Users" will have access to modules and can access documents.
Permission control is implemented by Geer ERP at the User and Role levels. Multiple roles and permissions can be assigned to each user in the system. The "System Manager" position is the most crucial one. Any user with this position has the ability to add new users and modify the roles for each user.
Role and Role Profile
A Role defines the permissions for accessing various documents in Geer ERP.
The Roles Permission Manager allows users to set the permissions that roles define. Geer ERP has the most of frequently used roles created so you may utilize the system with them. You can add more roles if necessary. For instance, if you give a user the Sales User position, they will have access to documents like quotations and sales orders because that role already has those rights established.
Role profiles store different roles so that multiple roles can be assigned at once.
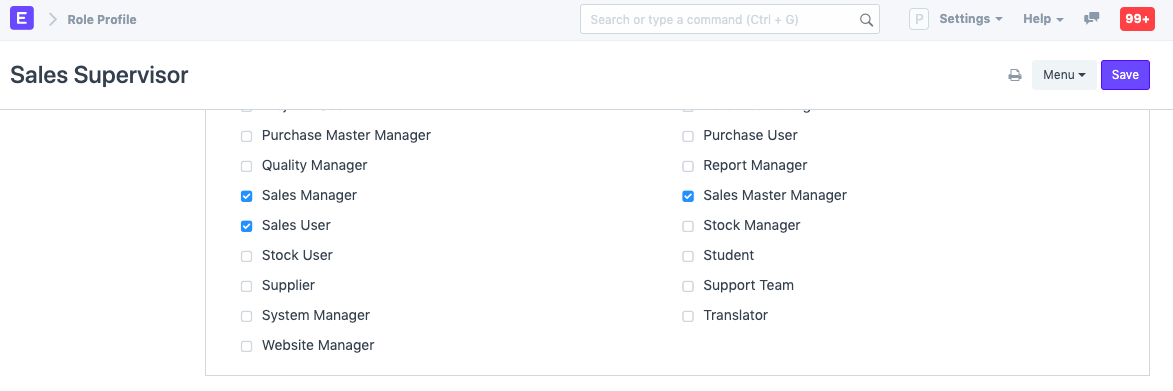
Role Profiles provide as a template for multiple roles to be stored and chosen. The user can then be given this Role Profile. A Sales Supervisor, for instance, might also play the parts of Employee, Sales Manager, Sales User, and Sales Master Manager. When adding several employees, role profiles come in handy for assigning multiple roles at once.
Go to: to access Role.
Home > Users and Permissions > Role
1. How to add a Role
- Go to the Role list, click on New.
- Enter a name for the Role.
- Choose whether the Role has desk access. A role that has desk access can access Geer ERP modules and the company's documents. The level of access depends on the roles assigned to the user. 1.Save.
The role can be restricted to a certain domain and given two factor authentication. From this point, you can access the Roles Permission Manager and configure the role's permissions for various DocTypes.
2. How to add a Role Profile
Go to: to access Role Profile.
Home > Users and Permissions > Permissions > Role Profile
- Go to the Role Profile list, click on New.
- Enter a name.
- Select the roles you want to assign to this profile.
- Save.
Role Based Permissions
Permission to different documents can be controlled using Role Based Permissions.
The permissions mechanism in Geer ERP is based on roles. It implies that Roles can be assigned to Users and that Roles can have permissions specified on them. You may specify which roles can access which documents and with what permissions using the role permissions manager (read, write, submit, etc.).
Once a person is given a role, their access can be restricted to only certain documents. Using a notion known as Permission Level of a field, the permission structure enables you to specify various permission rules for various fields.
- Useful hints
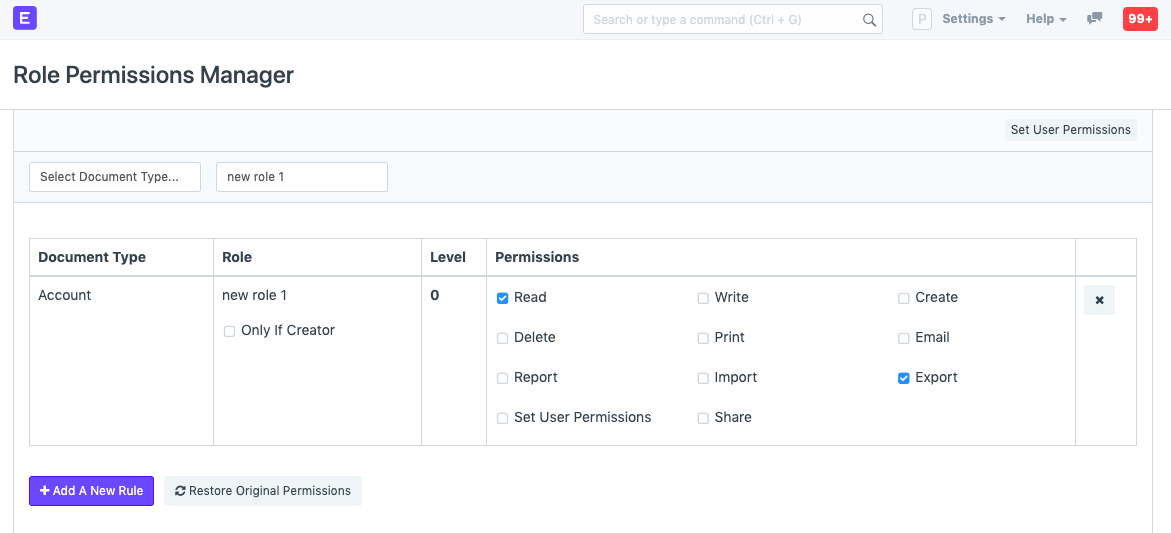
1. How to use the Role Permissions Manager
Go to: to begin utilizing the role permission manager.
Home > Users and Permissions > Role Permissions Manager
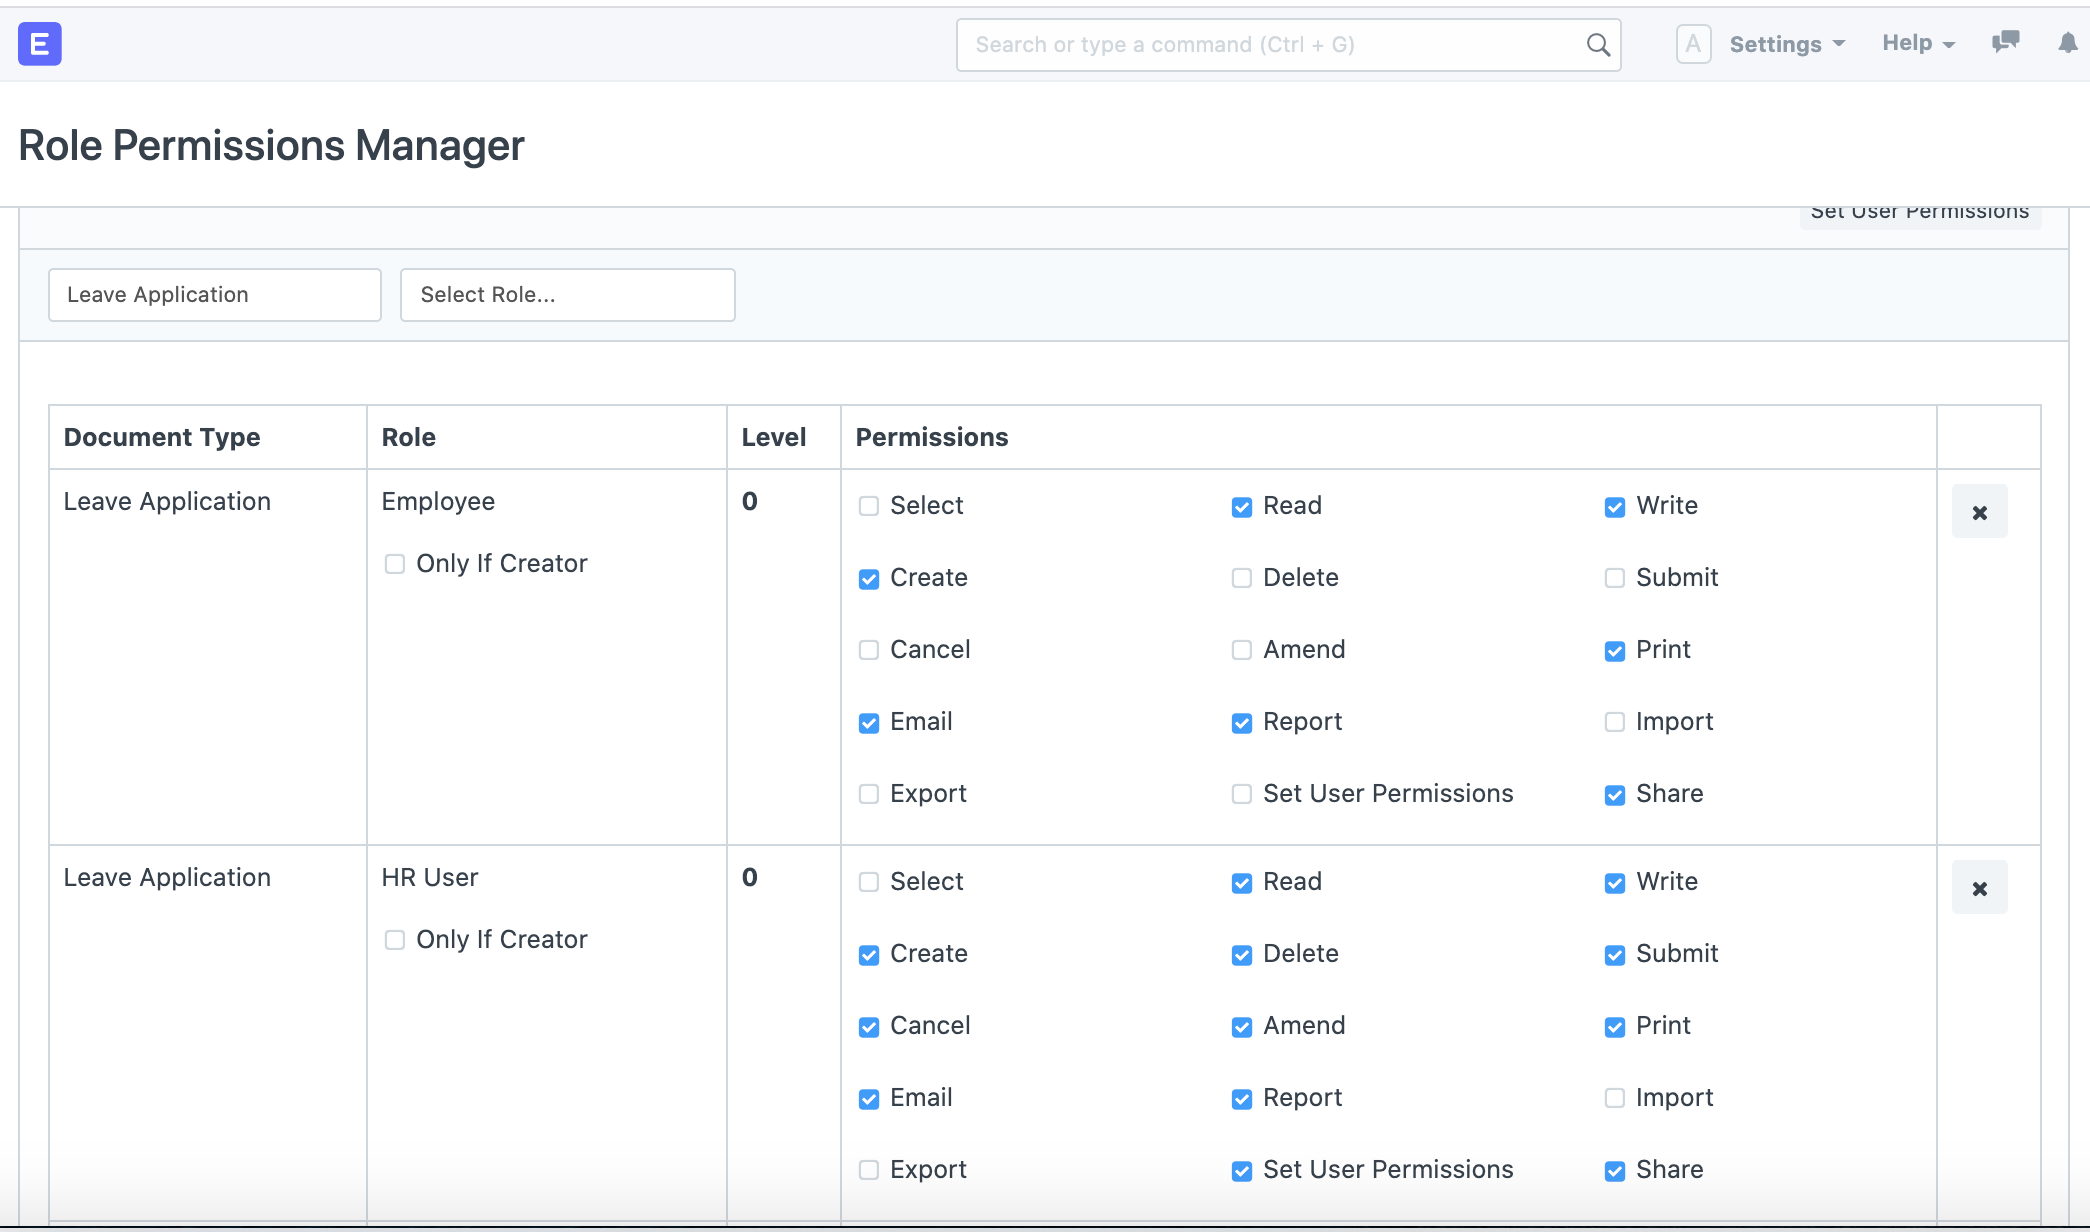
- Roles: As we saw earlier, Users are assigned Roles and it is on these Roles that permission rules are applied. For example, a sales user may be given the roles of an Employee and a Sales User.
Examples of Roles include Accounts Manager, Employee, HR User, etc.
- Document Types: Each type of document, master or transaction, has a separate list of role-based permissions as seen in the preceding screenshot.
Examples of Document Types are Sales Invoice, Leave Application, Stock Entry, etc.
- Permission Levels: In each document, you can group fields by "levels". Each group of fields is denoted by a unique number (0 to 9). A separate set of permission rules can be applied to each field group. By default, all fields are of level 0.
Permission "Level" connects fields with level X to a permission rule with level X. To know more click here.
Document Stages: Permissions are applied on each stage of the document like Creation, Saving, Submission, Cancellation, and Amendment. A role can be permitted to Print, Email, Import or Export data, access Reports, or define User Permissions.
User Permissions: Using User Permissions in ERPNext a user can be restricted to access only specific Documents for that Document Type. Eg: Only one Territory from all Territories. User Permissions defined for other Document Types also get applied if they are related to the current Document Type through Link Fields.
For example, a Customer is a link field in a Sales Order or Quotation. In the Role Permissions Manager, User Permissions can be set using the 'Set User Permissions' button.
To set User Permissions based on documents/fields go to:
Home > Users and Permissions > Permissions > User Permissions
- Add a New Rule: In the Role Permissions Manager, to add a new rule, click on the Add a New Rule button and a pop-up box will ask you to select a Role and a Permission Level. Once you select this and click on 'Add', this will add a new row to your rules table
2. How Role Based Permissions Work
A nice illustration of a permission system that covers all its components is the leave application.
- It should be created by an Employee. For this, Employee Role should be given Read, Write, Create permissions.
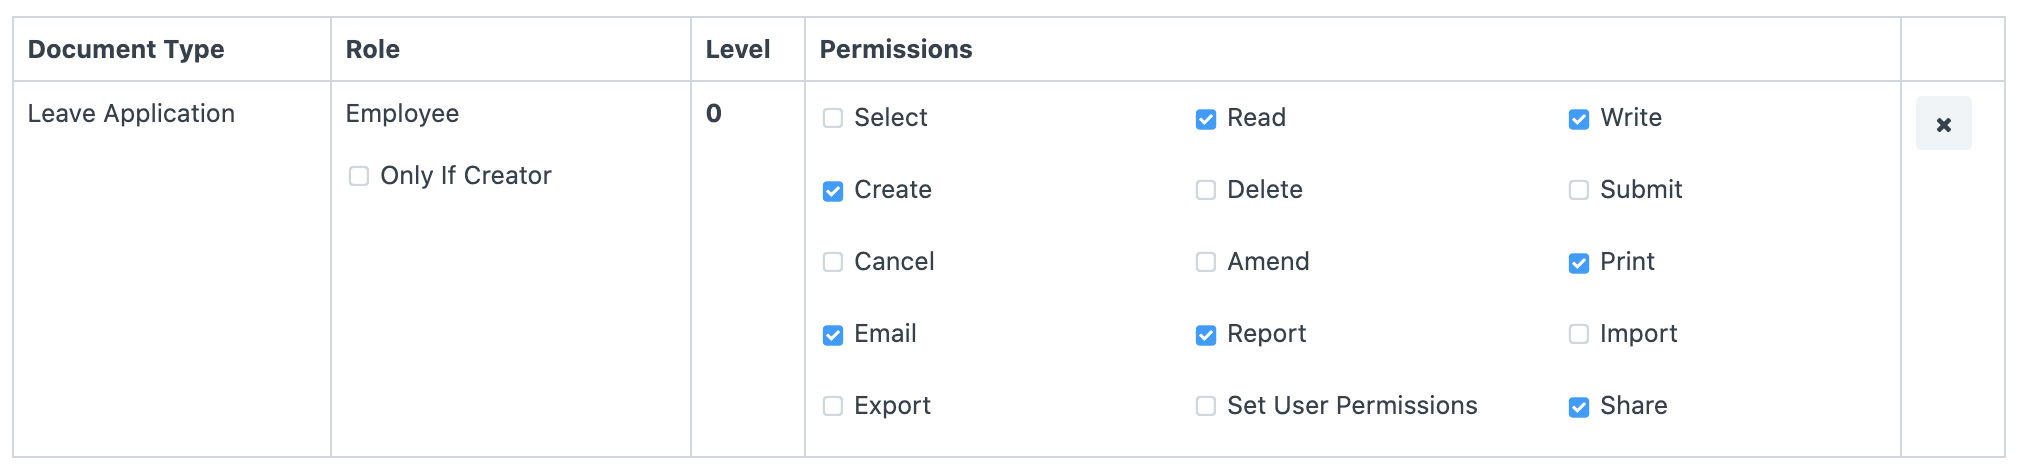
- An Employee should only be able to access his/her Leave Application. Hence, User Permissions record should be created for each User-Employee combination.
- If you want an Employee to only select a document in another document and not have read access to that document as a whole, then grant only Select perm to the role, Employee.

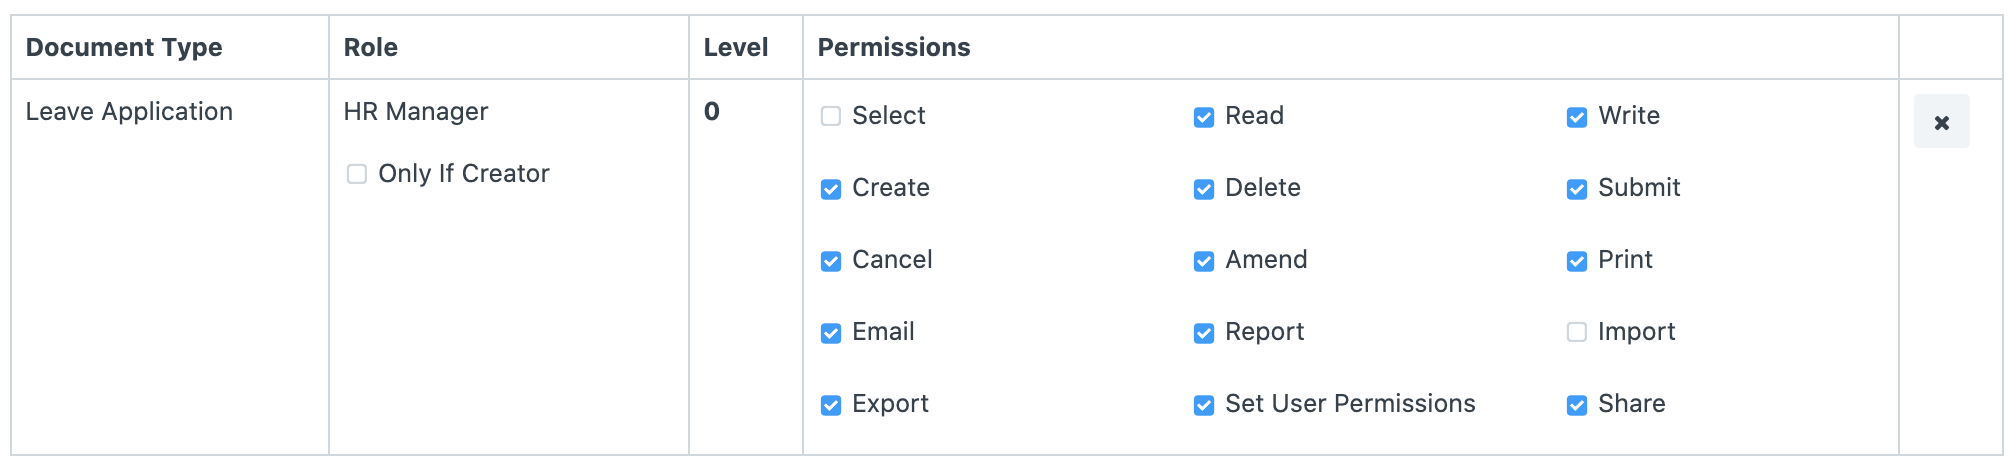
- HR Manager should be able to see all Leave Applications. Create a Permission Rule for HR Manager at Level 0, with Read permissions. Apply User Permissions should be disabled.
- Leave Approver should be able to see and update Leave Applications of employees under him/her. Leave Approver is given Read and Write access at Level 0. Relevant Employee Documents should be enlisted in the User Permissions of Leave Approvers. (This effort is reduced for Leave Approvers mentioned in Employee Documents, by programmatically creating User Permission records).
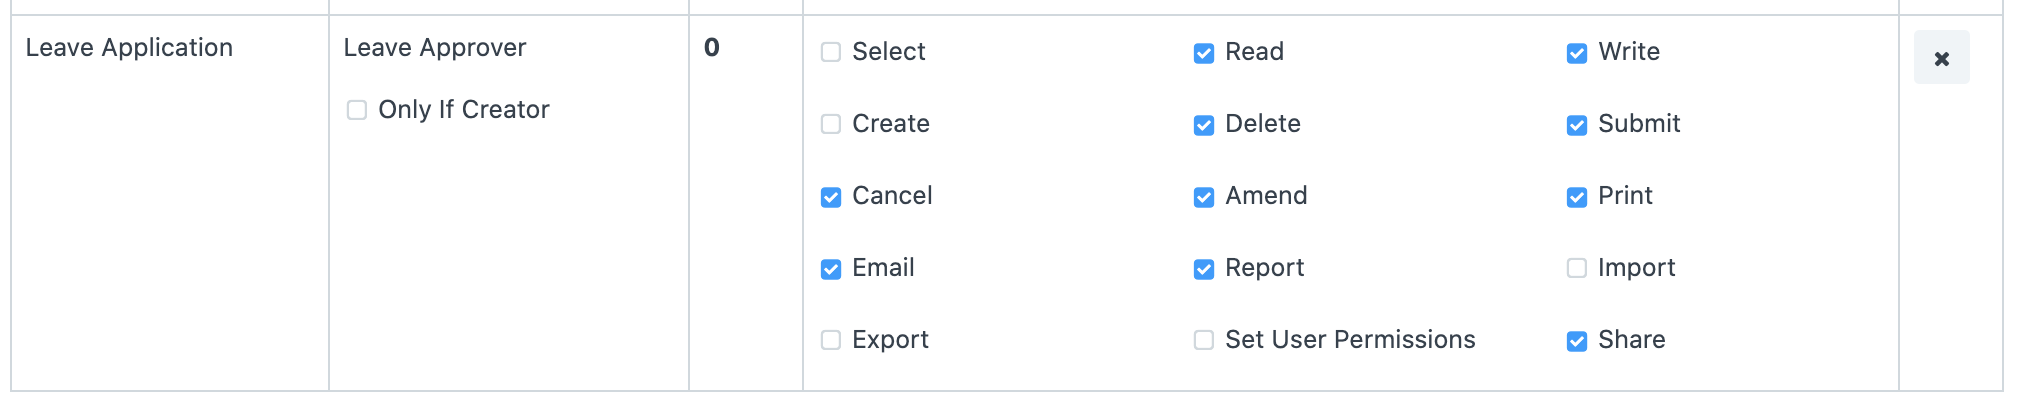
- It should be Approved/Rejected only by HR User or Leave Approver. The Status field of a Leave Application is set at Level 1. HR User and Leave Approver are given Read and Write permissions for Level 0, while everyone else (All) are given Read permission for Level 1.
.png)
- HR User should be able to delegate Leave Applications to his/her subordinates. HR User is given the right to Set User Permissions. A User with HR User role would be able to define User Permissions on Leave Application for other users.
 Refer to this page if you have successfully allocated the roles but are still receiving issues while attempting to access documents.
User Permissions
User permissions is a way of restricting user access to particular documents.
Complete (by default) access to a document type (doctype), such as a sales invoice, orders, quotation, etc., can be set using role-based permissions. This indicates that users who are given the Sales User role have access to all Sales Orders and Quotations.
Based on the document's link fields, User Permissions can be used to limit access to specific documents. Consider, for instance, that you conduct business in numerous regions and that you wish to limit certain Sales Users' access to Quotations and Sales Orders that pertain to a specific territory. Through user permissions, this is possible. Customers, suppliers, customer groups, supplier groups, etc. can all be subject to restrictions.
Setting user permissions can be quite helpful when you wish to impose restrictions based on:
- enabling user access to data that belongs to a single company
- enabling user access to information about a certain customer or territory
Go to: to access User Permissions.
Home > User and Permissions > User Permissions
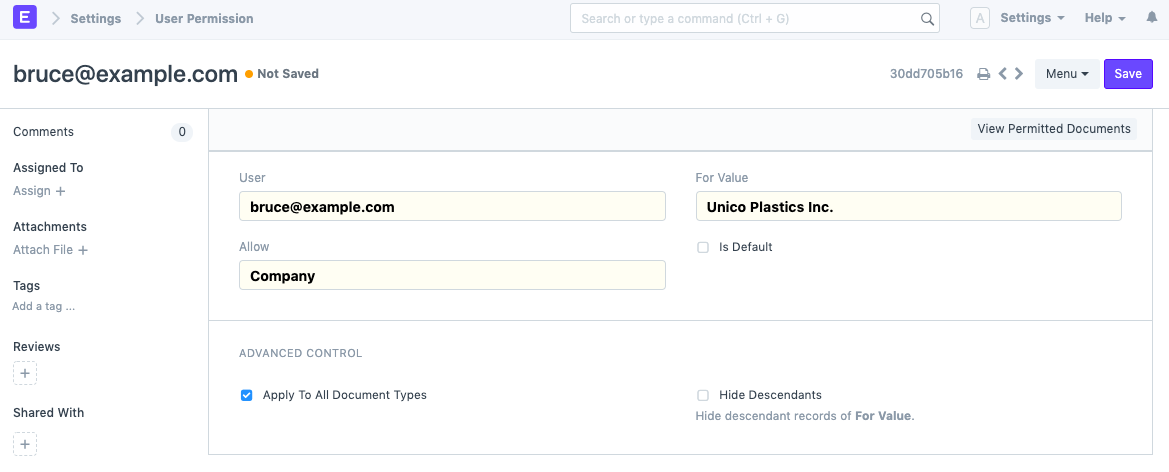
1. How to create User Permissions
- Go to the User Permissions list, click on New.
- Select the user for which the rule has to be applied.
- Select the type of document to be allowed (for example "Company").
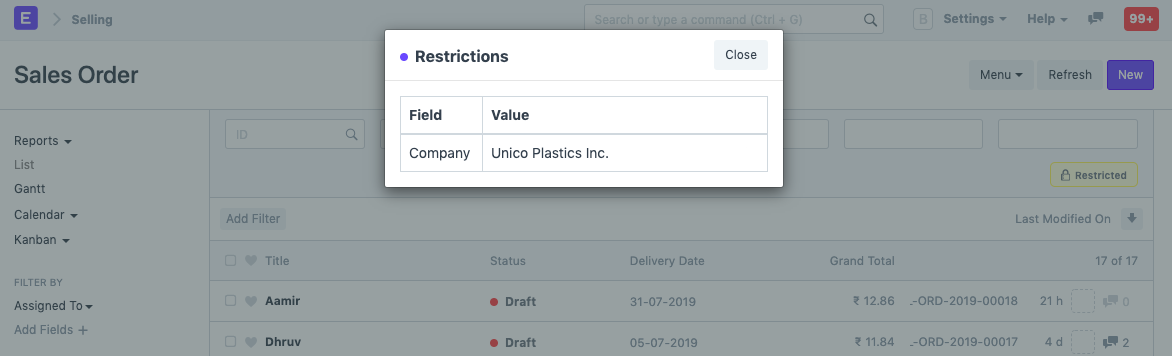
- Under For Value, select the specific item that you want to allow (the name of the "Company).
- If you check 'Is Default', the value selected in 'For Value' will be used by default for any future transactions by this user. That is if company 'Unico Plastics Inc.' is selected as 'For Value', this Company will be set as default for all future transactions by this user.
 The default user permission for a specific user can only be configured for one specific document type.
2. More User Permission actions
2.1 Advanced Control
You can have more control over where the User Permission is applied in Advanced Control.
2.1.1. Applicable For
By selecting the Document Type after unchecking the Apply To All Document Types checkbox, you can potentially apply user permissions just for a certain type of document. The current user permission will only be usable under the selected Document Type master after setting the Applicable For option.
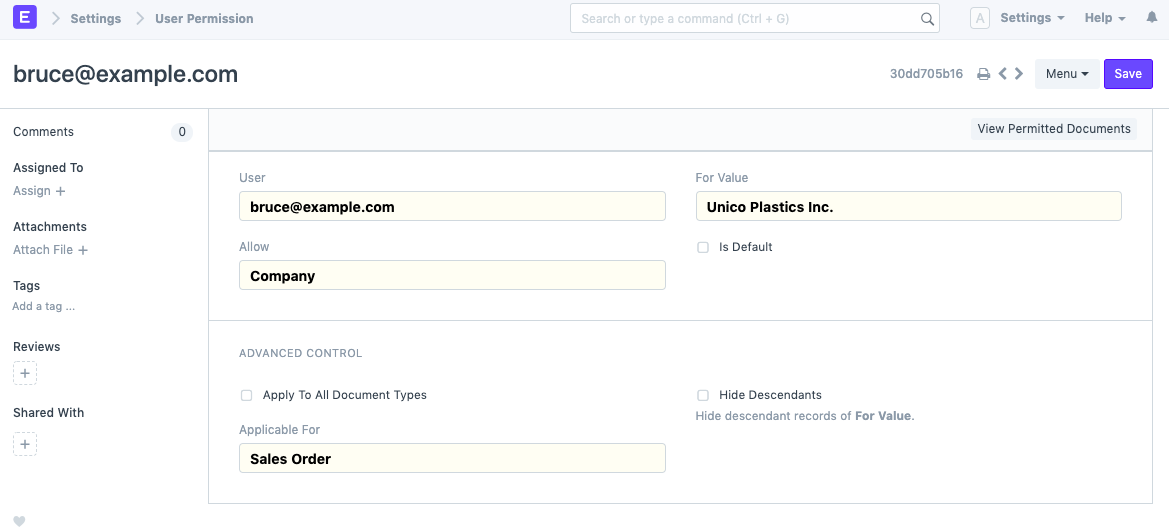 Only the Sales Orders of the chosen company will be accessible to the person with the aforementioned User Permission.
Note: If Applicable For is not set, User Permission will apply across all related Document Types.
Only the Sales Orders of the chosen company will be accessible to the person with the aforementioned User Permission.
Note: If Applicable For is not set, User Permission will apply across all related Document Types.
2.1.2. Hide Descendants
A DocType with a Tree View as its value could contain entries with parent-child or ancestor-descendant relationships.
Let's suppose Value's "Unico Plastics Inc." owns a subsidiary called "Unico Toys." Permissions for "Unico Plastics Inc.progeny "'s are included when a User Permission is created for this entity.
Only when a Tree View DocType is selected does Hide Descendants become visible. This tick will prevent granting permissions to For Value's descendants.
 A user that can view records of 'Unico Plastics Inc.' will not be able to view those of 'Unico Toys'.
2.2 Ignoring User Permissions on Certain Fields
Another method of enabling documents that have been limited by User Permissions to be seen by everyone is to check the "Ignore User Permissions" box next to a specific field in Customize Form.
For instance, if you want Assets to be available to all users, choose Asset as the form type. Expand the Company field in the fields table and select "Ignore User Permissions" there.

2.3 Strict Permissions
This more strictly limits user access to documents.
Visit the System Settings page to learn more.
2.4 Checking How User Permissions are Applied
Once you have developed an impenetrable permission model, you should evaluate how it applies to different users. The Permitted Documents for User report allows you to view it. You may view which papers a specific person can access by choosing the User and document type from this report.
By selecting the Show Permissions checkbox, the read/write/submit and other access levels will be displayed.
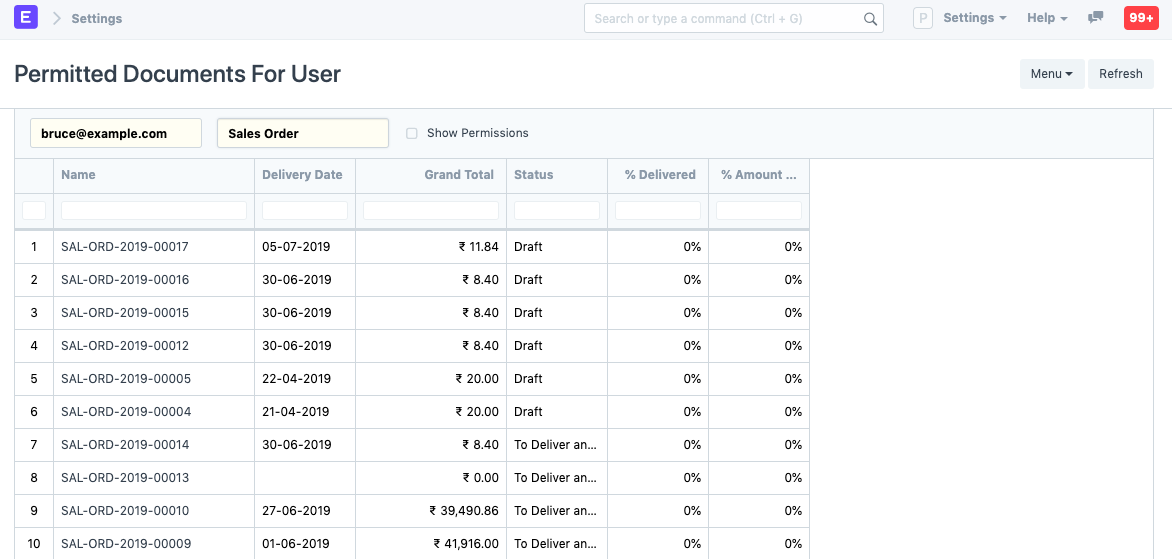 Recheck your role settings if you're having trouble accessing Sales Orders or any other document type on this list.
For instance, Bruce's access is limited to the company "Unico Plastics Inc."